Yes, yes it’s true the iPhone doesn’t have the capacity for shallow depth of field rendering in the way your DSLR or Mirrorless camera does unless of course, you go very close to your subject.
However, there are some differences between what you can expect in terms of depth of field rendering from iPhone DNG and JPEG versions. Here’s a short video that discusses the differences, it may cause you to do a little re-evaluation of the accepted wisdom.
If you want to know more you can always buy my “Ultimate iPhone DNG” eBook on the iBooks store.
A quick trawl through the catalog of Camera Replacement apps on the Apps store will soon reveal a plethora of apps laying claim to being the greatest thing since sliced bread. It can be a little confusing to sort out what you need and what really works.
My eBook “Ultimate iPhone DNG” has information regarding App choices but you might also like to check out this little video where I discuss the items/features that you would ideally be looking for…fact is some of the apps have deficits that rule them completely out of contention.
Here’s a quick question for you. Considering we’re spoilt for choice when it comes to amazing cameras and uber lenses that are able to render the hair follicles and yet unborn zits on supermodels at 50 paces why would you even think about using a mobile phone for anything other than a casual snap of that coffee and cake you had for morning tea.
Serious photos with an iPhone, are you serious, that just sounds totally contradictory!
Well if you disregard the differences with Depth of Field and the iPhones’ wide angle lens perspective you soon realize that when shooting iPhone DNG the dynamic range, sharpness and color are not too bad at all for many needs.
And here’s the thing, not all serious photos are taken by serious people with serious gear. These days lots of people who are not photographers are given orders from on high…”go and get me some pics of that event, make it snappy, and when ya done get it posted to our Instagram account…….. oh, and I want it on Facebook before you leave the office tonight or you’re fired”
Fact is, and I know this will hurt the ears, feelings, and egos of many of the sensitive photographic souls reading this. I get lots, and I mean “lots” of people who turn up in my workshops on Lightroom, Photoshop, Photo Composition, iPhoneography etc who’ve been made “Chief Executive of Multi-Media, Instagram and Facebook, Resident Communications Dynamo, iPhone Wielding Guru” for their business or organization.
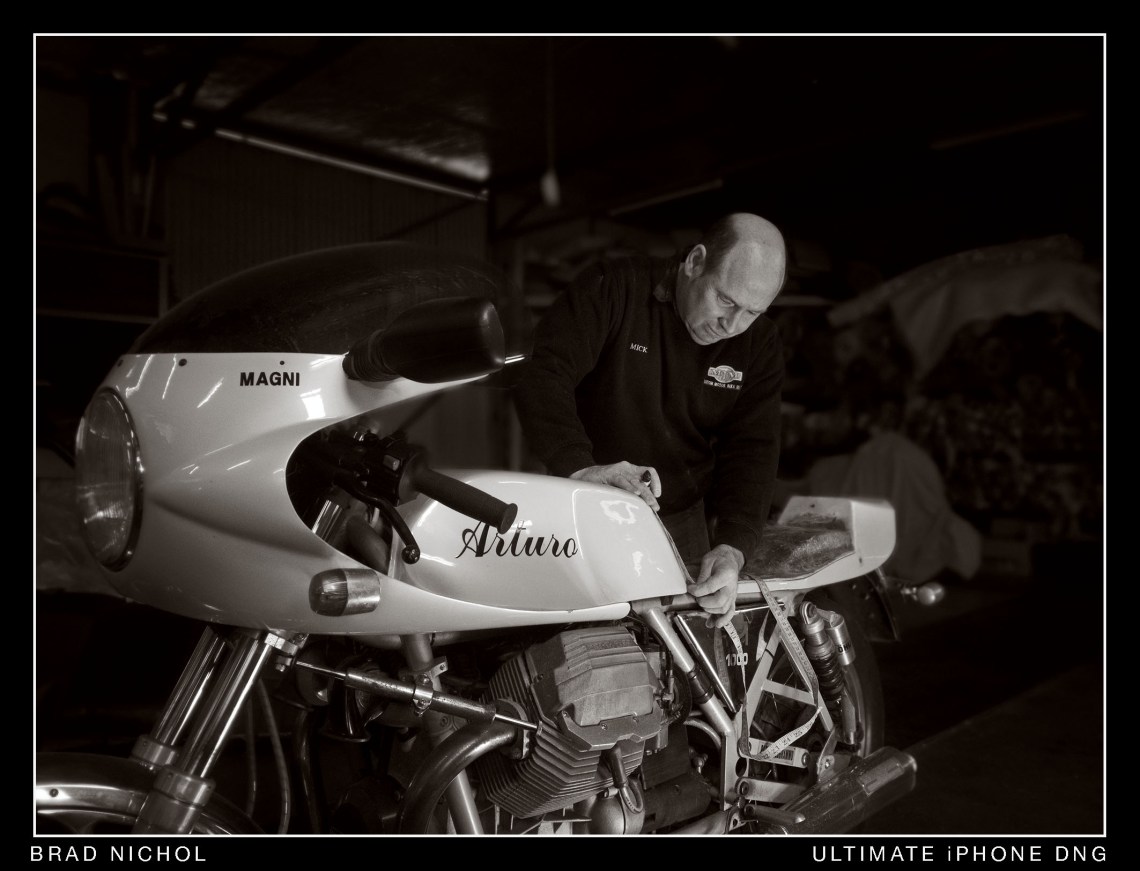
Whatever the material needed for your seat, Mick probably has a roll of it somewhere.
Often these folks don’t actually edit the pics, others further down or up the stream might do that, but sometimes they’re expected to also be the resident “Photoshop genius”, with all the impossible expectations that infers.
These people are not actually photographers, heck they never intended to be photographers but that’s what they’re now expected to do, and damn it, those pics better be good!
So here we are 2017, the iPhone has DNG and all the extra goodness that it infers upon one’s image options and we have an increasing number of non-photographers and indeed even some professional photographers who now use the tool for serious work.
When I was planning my new Ultimate iPhoneography series of eBooks it soon became obvious that one of those books should look at what photographers and non-photographers with serious needs could do with their iPhones. There’s definitely a strong demand for some wholesome but easily digestible information on how you might actually get the job done and importantly how to avoid the myriad of potential pitfalls.
Well that particular book’s still a way off, I’ve six planned for the whole series, the first book “Ultimate iPhone DNG” is already up on the iBooks store and the others are all well into the production phase but I thought it could be fun to show one of the sets of pics I’ve created in the preparation phase for upcoming “Ultimate Professional iPhoneography” book.
Lets just come back to the question of “why shoot serious (work) stuff with the iPhone”. I reckon there are several solid reasons.
The iPhone may be the only camera you or your workplace owns, maybe you or the workplace have decided that using a DSLR is just too complex. (I wouldn’t necessarily agree with that but I well understand the way many feel about this situation).
An obvious one is the need for rapid turnaround and the benefits of instant sharing and no doubt for a great many such uses the quality deficits are less relevant. You can easily crop the images severely and still have enough pixels for social media needs and honestly, regardless of how much traditional photographers protest, the fact remains only a very small proportion of images shot for promotional purposes find their way into print at anything larger than say 5 by 7 inches. Now even allowing for reproduction at 300 PPI, that 5 by 7-inch print only equates to around 3 mega pixels.
But I think you can make a case for iPhone shooting that transcends the traditional convenience and resolution sufficiency arguments, a case where sometimes the iPhone might technically be a great choice. (ASSUMING we are shooting in DNG)
Yep I know, right about now there are virtual knives and spears being thrust forth into computer monitors in the hope of impaling me or at least banishing my presence for the outer reaches of the inter-web, but please humor me, I’m just a country lad from a place that no-one much knows about.
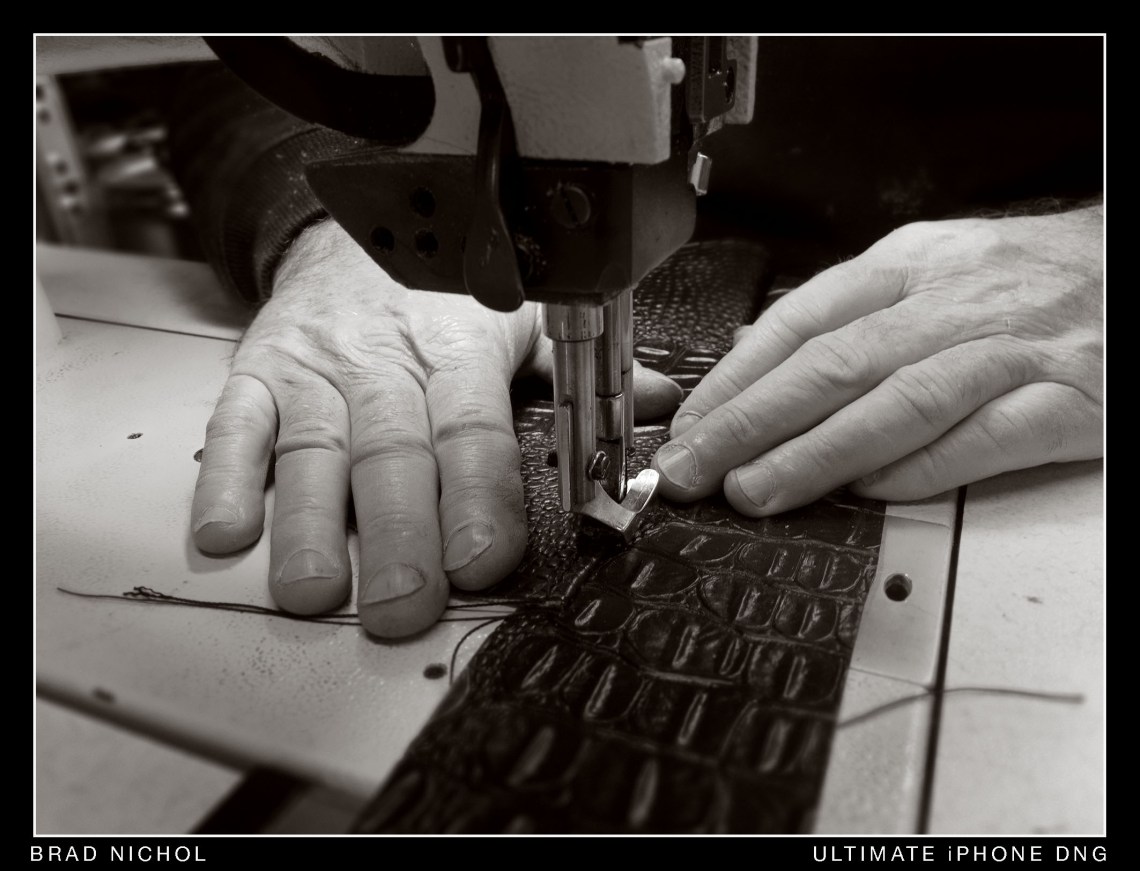
The industrial sewing machine had no issues at all in sewing heavy materials.
So what might those technical benefits of the iPhone be?
Well, Depth of Field is enormous, it’s pretty easy to get everything in focus and sometimes that’s just what you need. This fact might seem a little surprising to many who have come to the photography table since the advent of digital but once upon a time getting deep depth of field was a challenge and something professional photographers went to all sorts of lengths and contortions to achieve.
Related to the depth of field rendering, the iPhone can easily get really close up photos nicely sharp and yet still have quite nice separation between the subject and background elements.
Going further the lens is wide-angle, but it’s actually sharp right out to the corners, which is not a given with many regular wide angle lenses on DSLRs and Mirrorless cams.
Better yet, the lens/sensor size combination enables you to have some interesting perspective renderings that are impossible with larger sensor sizes without image stacking.
Now yes the iPhone is potentially a noisy little blighter but actually, the luminance noise, when shot in the DNG format at slightly elevated ISOs, is rather filmic and has a certain artistic appeal that actually works nicely for some types of images and especially monochrome.
Another aspect that few people will have considered is that it’s relatively easy to get total deep focus rendering from very near to distant objects by using focus shift techniques with only 2 or 3 frames.
So that’s not a bad list and for the working photographer and a tool only needs to excel in one specific aspect to make it viable for some selected shooting needs, no-one’s claiming the iPhone is the perfect portrait device, the ideal copy camera, the most powerful landscape tool, the last word or even the first word in the world of sport photography shooting, but then it doesn’t need to be either.
On the other hand, let’s face it, most DSLRs and Mirrorless cameras are still pretty hopeless when it comes to social media duties and many are very difficult to use for close-up work unless you have lots of other macro bits to go with them.
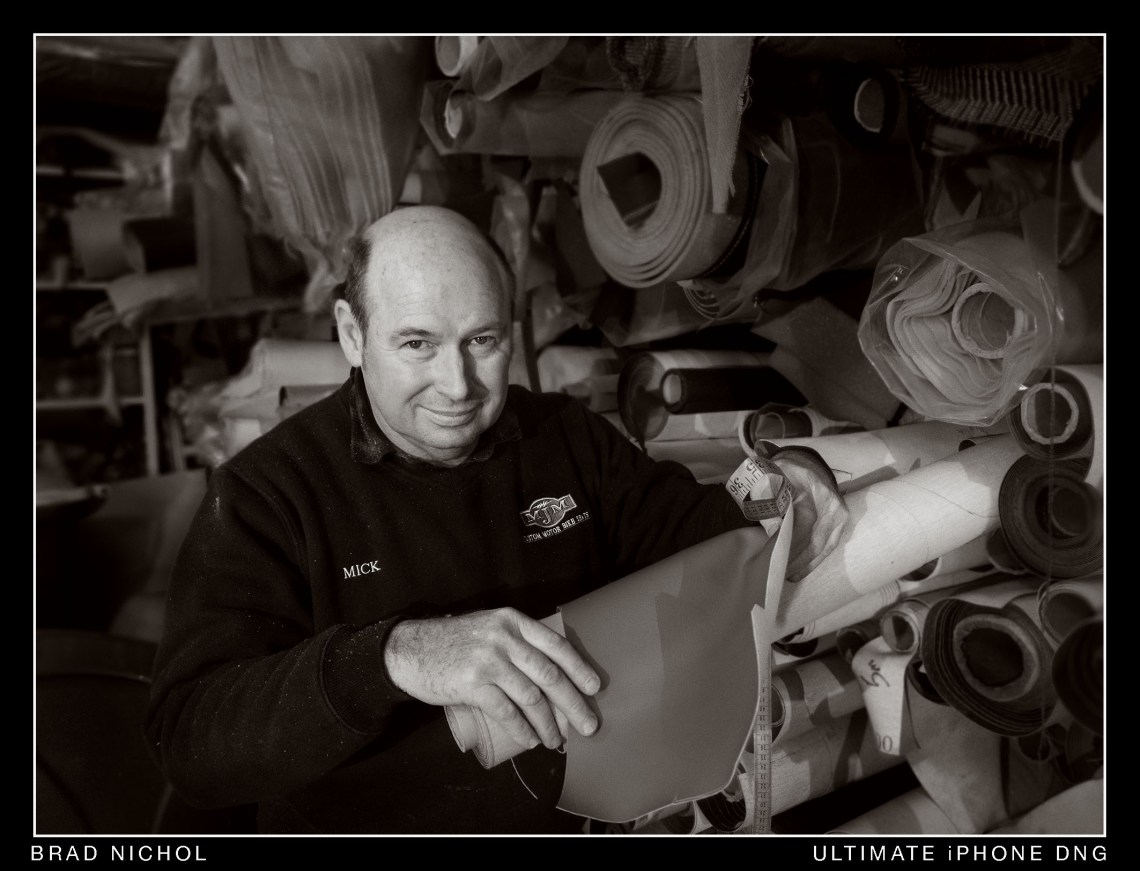
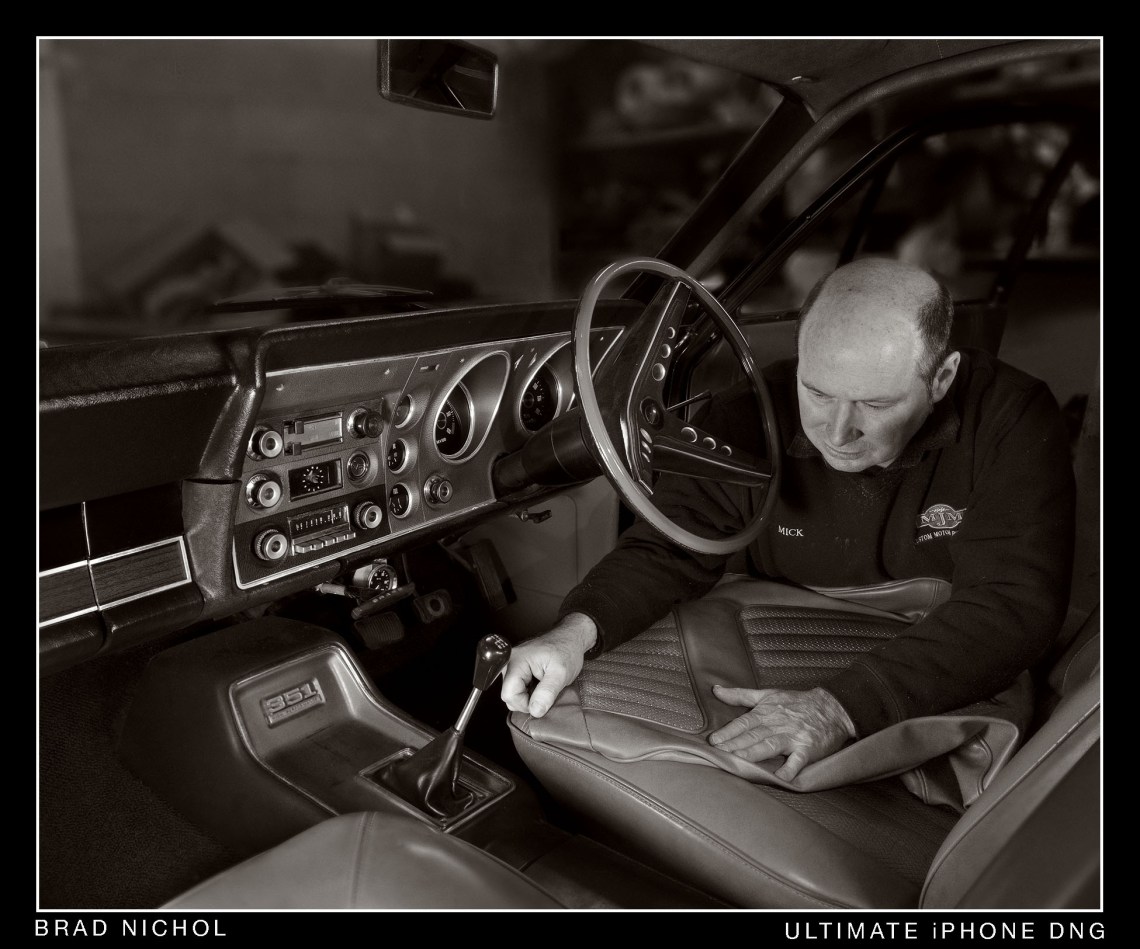
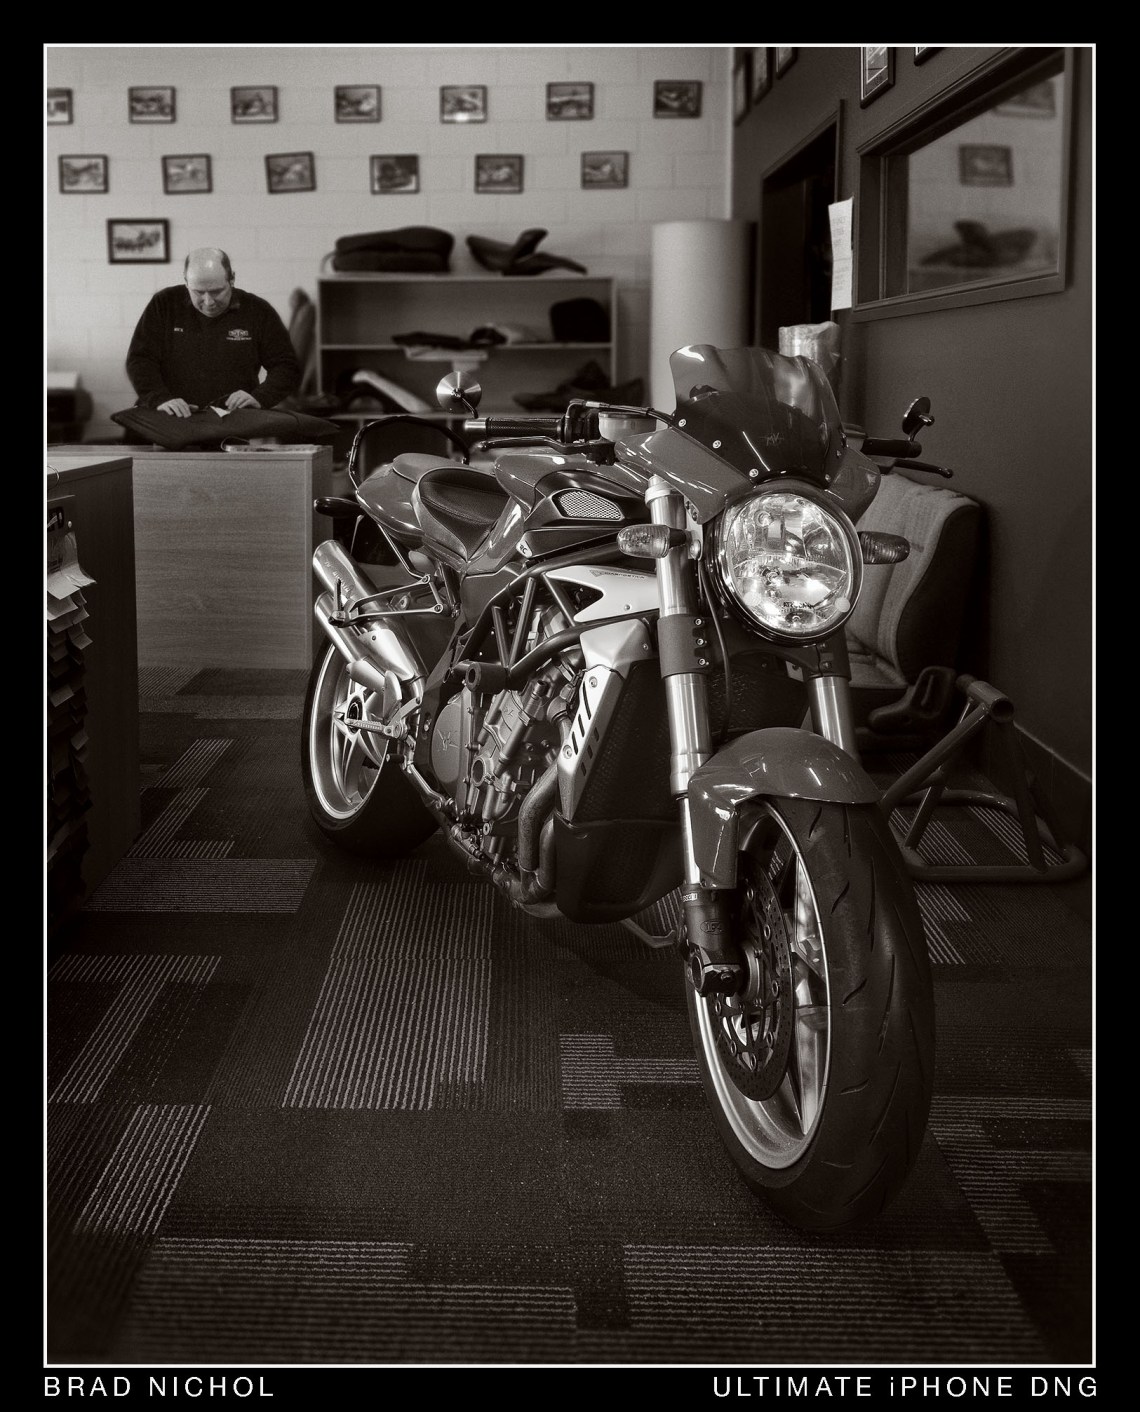
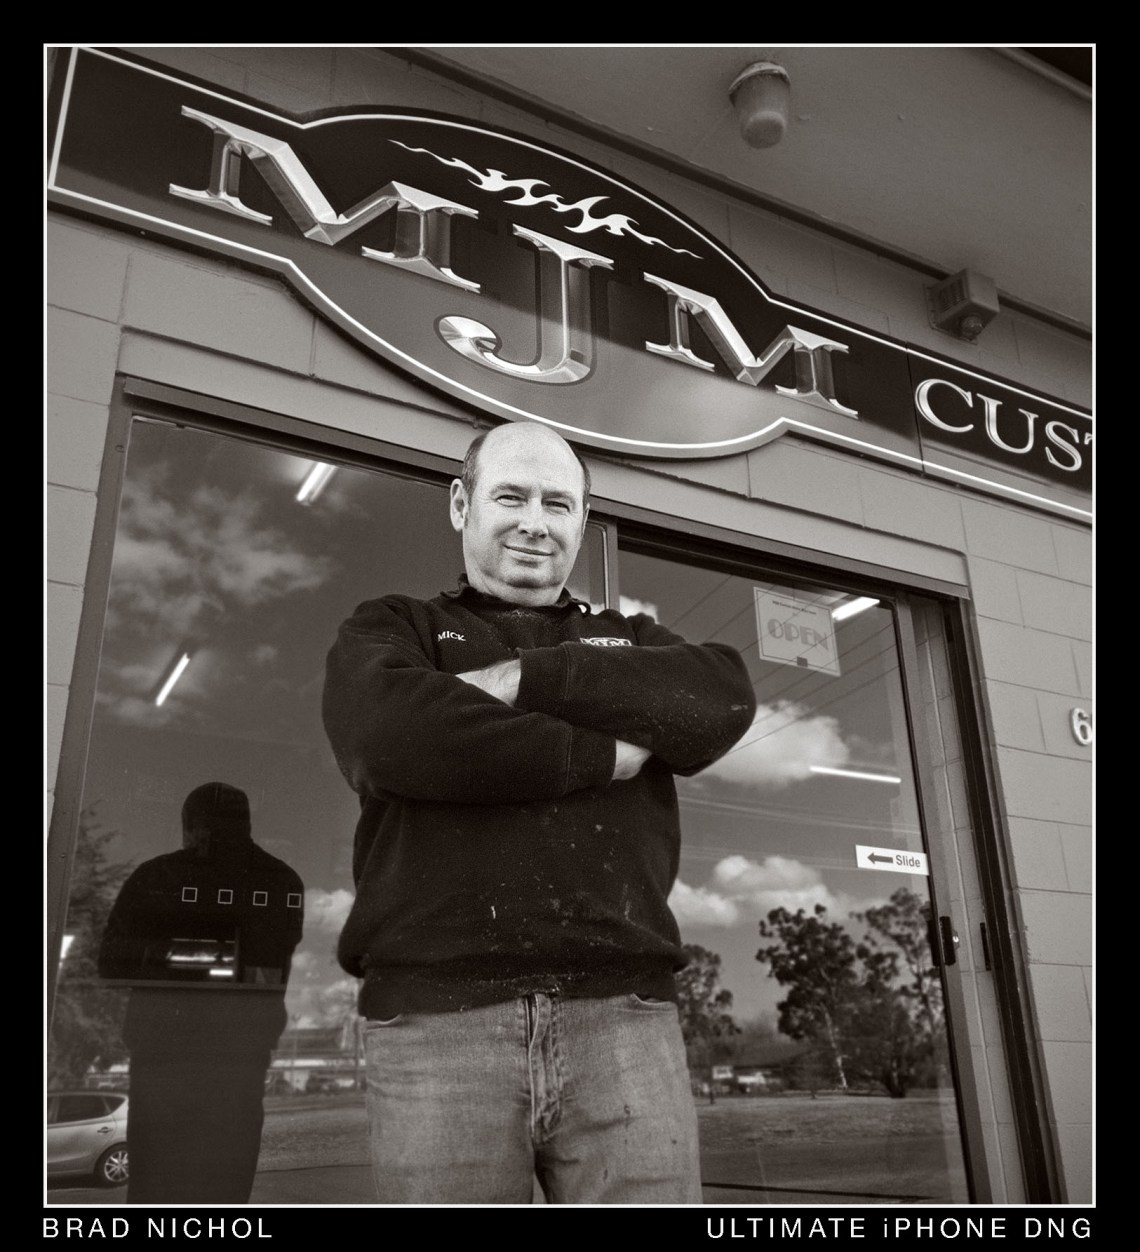
So onto the pics, our subject is Mick McCarthy from MJM Vehicle Trimming in my hometown of Goulburn NSW. Mick is well-known for making the best custom motorcycle seats around for people who really want to be able to plant their butts on something more comfortable than the average plastic board with inverted nails that seems to pass for a motorcycle seat these days. He still does some regular motor trimming for folks with special cars but basically motorbike seats are his gig, he also happens to be my neighbor and a friend.
I’ve gotta say it amazes me that all of the bike manufactures can produce machines which are brilliant in every way, yet they still can’t make a seat that soothes the average butt for more than 20 kilometers. Maybe we’re not actually meant to ride modern bikes, maybe we’re supposed to take them to the coffee shop, park them and then proceed to talk all kinds of BS about how great my bike is compared to your bike. Anyhow Mick does great seats, the one he did for me totally changed the way I felt about my bike, that’s for sure.
Mick is a bit of “bike n car nut” and has a nice little collection of his own, and he really is a terrific bloke who loves to shoot the breeze on all those mechanical things that we fellas get excited about.
I wanted to create a set of images that gave a good account of the man and his craft, something that his family might treasure, but also something that told the story of MJM.
Mick hard at work sewing a motorbike seat.
I think that shooting DNG files on the iPhone worked treat. I was able to get a tight close-up shot, super deep depth of field renderings (which I then dialed back to taste), a lovely filmic look and with appropriate editing some terrific shallow DOF stuff all with more than passable quality for most regular usages. And I have to say I love the fact you can get into tight confines with the iPhone, it really is easy peasy with the iPhone on a selfie stick.
Lots of people get really hung up on the issue of noise but the honestly the noise when you shoot in iPhone DNG isn’t too bad and importantly it can be fine-tuned and even used creatively. The key is not to shoot at high ISOs and before someone starts furiously typing a “full and well-expressed rebuttal on the folly of only having a low ISO option” think about it for a moment or two. The iPhone lens is fixed at f2.2 or f1.8 and you don’t need to stop down to say f5.6 or 8 to get some clarity or depth of field, meaning you don’t need high ISOs all that often, provided of course you have the camera properly supported. Some of the shots I took in his shed were at 1/5 sec or so but it all worked out fine.
And if the light is MIA and you need to bring in some artificial light via LEDs or tungsten then you don’t need near as much of it to lift the brightness levels to something workable when using f2.2 at say 100 ISO. If you needed to use f5.6 – 8 @100 ISO with a DSLR you’d need about 8 to 16 times as much lighting power, meaning either more lights or more expensive lights or a non-continuous light source, in other words, flash.
Yes, of course you could shoot your DSLR at a longer shutter speed, but then you’d risk subject movement or you could raise the ISO to 800 or 1600 ISO but then the difference between the quality of the two devices (when shooting in iPhone DNG) would not be near as wide as you might expect. In any case, this article is aimed at those who are shooting with the iPhone and really don’t want to use a DSLR.
And just so you know, yep of course these shots have been lit, but in keeping with the concept of making it practical for those who need to use the iPhone for work stuff I kept it simple, just a couple of LED work lights on a pair of cheap stands with a couple of bits of foam core board. All up the lighting stands and other bits represent about a $200.00 investment, which most businesses would pay for out of petty change.
Of course, if you want to compare JPEG outputs then all bets are off, those iPhone JPEGs are variable at best and the attainable quality level is nothing like that offered by the DNGs, so please don’t send me any arguments based on the JPEGs, I’d just be nodding my head in full agreement.
The big advantage of the DNGs over JPEGs is the pushability of the files, you can dodge and burn, sharpen and blur, crop and blow up in ways that the brittle JPEGs never allow.
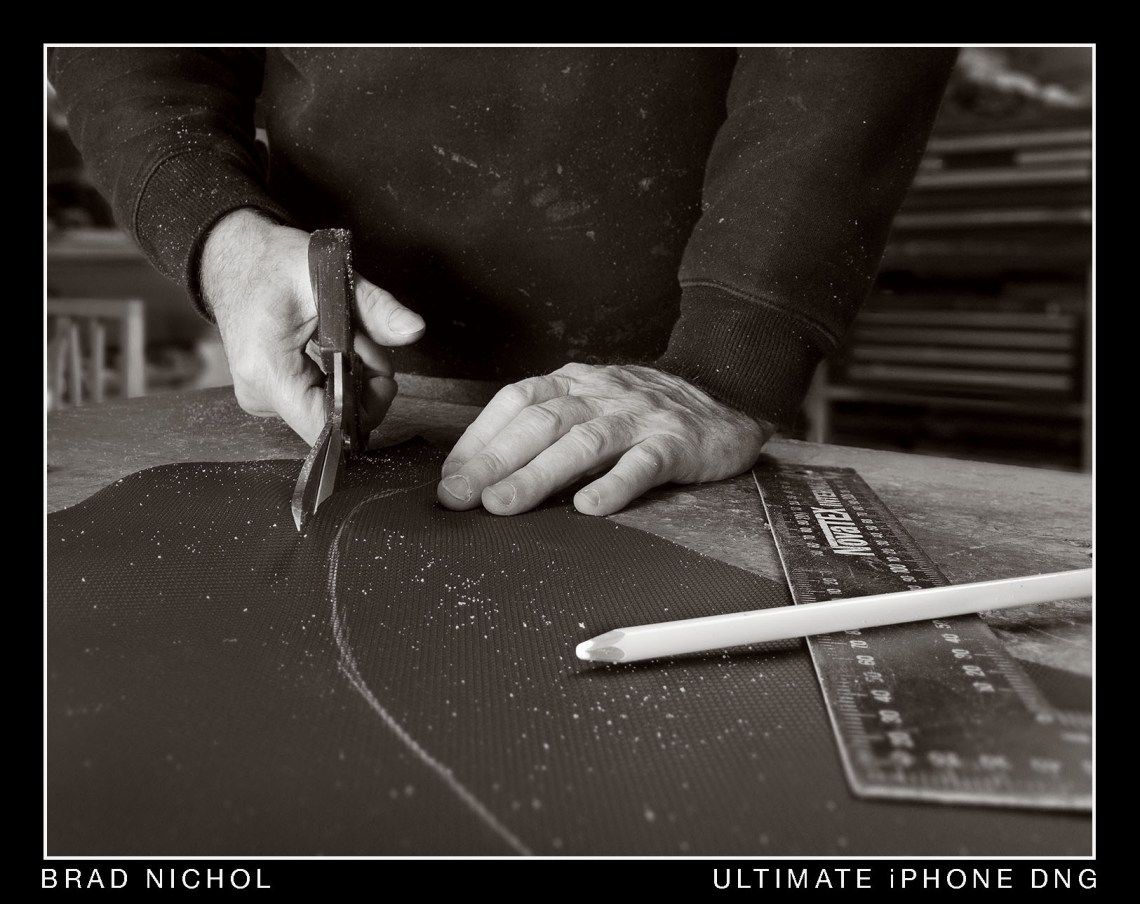
Freehand cutting vinyl for a motorbike seat.
I find the idea of shooting with the iPhone then working out the Depth of Field rendering in post quite appealing, I’d normally choose to use a different camera if I want the shallow DOF look, but the approach can work pretty well.
Sure it takes a bit of work but then with practice, you get pretty quick at it, more importantly, it allows me to create DOF renderings that would be difficult or impossible if shot with regular DSLRs or Mirrorless cameras. In some ways, and I know this will prove a challenging statement, but sorting the DOF out in post is close in terms of flexibility to what you could do by using a view camera with tilts, shifts, rise and fall, except without all the chemical and scanning stuff arounds. Yes, Yes I know it will not be as detailed etc, but we are not producing full-page spreads and billboards, basically most stuff goes straight to the web these days and honestly this approach looks fine for social media stuff and I reckon looks quite a bit better than the effects you get using the iPhone 7S plus portrait mode.
Going further on the Depth of Field simulation option, you can create looks that would not be possible with regular lenses, it’s easy for example to simulate the look of lens with significant field curvature or tilted focal planes such as with a tilt/shift lens, bokeh can be whatever you want and importantly you can create sharpness fall off characteristics that would be impossible with almost any regular camera. Ultimately if you start with an image that has overall sharpness, in other words, deep depth of field, you can blur it to anything your heart desires (given enough time/skill), on the other hand you can’t start with a shallow DOF image and then find clarity that was not recorded in the first place.
Sure this is a different way of working and it won’t suit everyone but like most techniques in photography, it’s just another option that might suit some specific needs. I imagine that those photographers who are fixed on the idea of photography being “what comes out of the camera” and with a strong belief that “editing is the devils work” will choke on the DOF simulation concept, but…. there are a great many of us who just accept and embrace editing as an integral part of the whole process.
I chose to go with a sepia monochrome look for this shoot but the colour versions are fine despite the basic light sources used, I’ve also added a little noise to give a more filmic feel.
iPhone DNGs can give quite different looks depending on how they are extracted and in this case, I used Iridient Developer with the noise reduction turned off. As you might expect that makes the files a little noisier but means they also look more film-like and more importantly they work really nicely with DOF simulation processes in Photoshop when you’re including added noise in the blurring process.
You might think, well sure the pics look OK on the WEB but surely the prints would be poor. Not so, 11 by 14s prints look rather nice and long ago worked out that if you make a good 11 by 14 you can pretty much print a file any size you want when you take into account the increased viewing distance.
I’ve put together a nice layout for Mick that he can frame and put up on his wall and despite the 36 by 34-inch size, the resolution is absolutely perfect.
Anyhow thanks for reading and I hope it has provided a little inspiration, Oh and if you want to know how to really shoot and deal with those iPhone DNGs check out my book “Ultimate iPhone DNG” on the iBooks store and you can also have a look at some other pics on my dedicated iPhoneography instagram site.
Just look for.. zerooneimaging or iphoneraw01 on instagram
I’ve seen few items on the inter-web claiming there’s little difference between the JPEGs and the DNG photos, I’ve also been often asked about this in classes. I reckon it’s high time to put the situation straight.
There’s an enormous difference between the two, it’s like comparing a takeaway hamburger n chips to a fine Italian sit down meal, not even in the same league. If photographers are not seeing this difference it likely boils down to one of three issues.
Maybe they’re not editing the DNG files correctly or possibly not editing them at all, instead they are just looking at the initial “JPEG setting rendering”.
Could be that the images are only being viewed as small on-screen versions, in other words they are not being viewed on a large hi-res computer screen or as prints.
And…. the most likely the issue is poor DNG exposure.
It could of course be a combo of all three but regardless of the cause I have a little video where I discuss this issue, might be worth checking it out. Of course all the intricate details and issues are covered in my “Ultimate iPhone DNG” e book which has just been released on the iBooks store.
It’s a common question and there are several reasons. In the end, DNG is not really an impediment to your mobile photography but rather a powerful option that will almost always improve the results you get from your iPhone……provided of course you have an understanding of the core concepts and don’t mind doing some post-shot editing.
Why would you simulate depth of field on iPhone photos, after all, we all love a nice bit of fast glass, the bragging rights delivered by nice 85mm f1.4 are just brilliant when you have leg up on the brass and coldie in hand at the local watering hole. Of course, we all know that if we want that “dreamy creamy bokeh bonanza” fast glass is the way to go……or is it?
There are a few downsides to all that bokeh driven madness, let’s count them.
First, you actually need to have the camera and mentioned heavy bokehlicious lens with you at the time. Funnily enough, some of us are just plain slack and we baulk at the idea of carrying such a bulky rig with us everywhere we go.
You know how it is, juggling the dog lead, doggy treats and carrying uber DOF master rig all at the same time, whilst trying to stop your furry face licker from all manner of canine misadventures.
And then there’s the lack of camera parking room on your favourite coffee table at your favourite cafe, oh and not to mention your aching neck, shoulders and the bruising on your “one pack” from that DOF meister rig bouncing around like Bjork at a Rave as you clumsily shuffle around.
Yep, the best camera really is the one you have with you, which for me and a significant proportion of other shooters is more often than not, the iPhone. It doesn’t mean I want to sacrifice all that Bokeh shallow DOF goodness on the altar of convenience though, hell no, I want it all.
But dear reader, and I really must say this in hushed tones, (just hold on a minute, whilst I put on my chain mail, fireproof suit and motorbike helmet, dum de dum, ah there you go, all done),…….. sometimes you can get a better result by actually doing the DOF sim shuffle.
Ouch, who threw that, I saw you!
Simulated Depth of field on this close up iPhone shot of Tawny, our resident Frogmouth, he lives part time in our backyard, he’s very tame and quite happy to be shot close-up with the iPhone. The DOFsimm’d look is nice and makes him stand out rather well, especially considering that Frogmouths are normally the masters of disguise.
See it’s like this, just maybe you actually don’t want the 4 eyelashes, 3 nose hairs and one bloated magenta zit on the right cheek look, like dude, maybe you want something a little bit more sophisticated such as, oh I don’t know, a whole face in focus and a gently diminishing background blur that’s just a tad softer on the corners and super dooper soft on the most distant objects. Yeah I know, I’m hard to get along with.
Maybe you actually want those “in focus bits” to be truly ruly sharp, not just sort of glowy sharp.
Could even be you want a DOF look that’s not actually technically possible using regular aperture adjustments on a regular camera.
And what about bokeh rendering….well what about it….well maybe you want something that your DOF monster 300mm f0.95 won’t actually deliver. (Sorry, I was getting a bit silly there, but you know what I mean)
So shoot me, (whoops, just ducked in time) but you know what, you can always start with a sharp image and get down and boogie, um I mean bokeh, but you cannot start out with a creamy dreamy bokeh bonanza and find details that went MIA at shooting time.
Now sure DOF simming’s not for everyone, some folk just want to press the shutter and go home to a nice warm hot cocoa and lie down with a good book, some folk think their camera is a machine gun and you need to expend 1000 rounds to get coverage for every possible shot, well DOF simming will never float these folks boats, I get that.
Now just so you know, yep I’ve also got full frame, half frame, quarter frame and bloody big film frame and more lenses “than my wife knows about”, so it’s not like I don’t have the so-called sensible DOF choices if I want to use them.
Shooting for me…well, I’m pretty selective when it comes to taking shots, I prefer to take a few selective shots and then nicely edit them to suit my tastes. I long ago came to the conclusion more is often, well, just more and less is a lot less work. But when you do more with less well that’s bess….I mean best.
So putting aside the time to have a blurry old-time in Photoshop on a few pics is no hardship, mind you I doubt I’ll ever do it this way for a big commercial shoot…..well not unless someone really wants to pay me to do so, then all bets are off. Money talks you know!
A rather lovely Ducati Bevel Drive motor, taken at the Ducati Museum in Bologna, Italy, the subtle depth of field effect works a charm and accentuated the simple beauty of the bevel housing.
This is not a “how to” article and one day when I get a rush of blood to the cranium and be tempted to make a little YouTube clip on my methods and furnish a few special secret sauce killer tips. But…First I’d need to find some hot bikini-clad ladies (apparently compulsory in almost all “tube” photography lesson clips), or get some cats (also popular and near-compulsory), learn some banter from the youtube bros and drop a few pounds – but generally I can drop a few tips here that might help you “would be dofmeisters”.
(Note since I wrote this I have embraced the world of “Tube”, but without the Models and cats…just me)
I don’t get all carried away with masks, depth maps etc, I just use multiple layers blurred to different degrees and brush it all in freehand. No sir there are none of your fancy schmancy pants pen tools selections and all that crafty caper. I’ve got reasonably handy with brush tools over the years and whilst I’m happy to spend quality time in Photoshop I also want to get the job done efficiently and hopefully reasonably quickly.
I also make use of several types of sharpening methods, high radius, low radius, ultra-low radius, blurb-blend sharpening, high-pass filter and add noise filters, we’re all good friends you know and we play nicely with one another.
Subtle depth of field simulation applied to Mechanical Exhibit in Wellington Museum, taken with dim available light using Cortex Cam on the iPhone 6S Plus.
The real secret sauce is actually in the shooting, first, regardless of what I’m shooting I’m very precise with my techniques but importantly shooting in DNG is super important.
If I think the image is going to be DOF simm’d I try to shoot it so there’s at least some separation between the subject and the background and I especially try to keep the backgrounds unobtrusive and not too busy. Honestly the last bit can be hard to do and sometimes a busy background when DOF simm’d can have a charm all of its own.
I also look for the right light, in other words, light that has some direction but not too harsh. I’m not afraid to ask myself or the subject to move to get the right light, assuming, of course, the subject is human, canine or mobile in some way. I wouldn’t bother asking cats to move of course, cause you know exactly what cats are like….which is probably why I haven’t made any YouTube clips yet. (with cats in them)
This is a little hard to explain but trust me, depth of field rendering and apparent separation has a hell of lot more to do with getting maximum image sharpness on the planes that should be …well sharp than just adding big blur. Blur will look a lot more blurry if the sharp bits are actually really sharp. DNGs da bomb because with the right methods the images are just sooooo much more detailed in the first place, that and the fact that I can precisely control the noise signature with DNGs.
Serious JPEG iPhone shooters will be very familiar with the terms….mushy, soft, plastic, watercolour like, flat, smudged, you get the idea. iPhone DNG is nothing like this!
Last and definitely not least I have some special capture methods that really make those DNGs sing, no clues I’m afraid but you can always buy my book if you want the inside running on that aspect.
Like lots of photographers I use an iPhone as a regular camera, I love the “in your pocket, unobtrusive, instant feedback” aspect of shooting with the Phone. Being able to easily share snaps with family and friends instantly adds enormously to the appeal…take a shot, tweak a little and airdrop it to my kids or friends over a cuppa, what’s not to love about that.
And of course I get a regular stream of pics and videos of my new Grandson and the Families exploits in return. As a family we carry our visual lives in our collective pockets and handbags, a well-shot snap can convey a wealth of information that words often struggle to say.
I don’t get hung on the idea that a photo should be purely the result of the camera and lens, I’ve always believed that editing and presentation are just as important. I’m convinced good edits can make the idea and message more direct and maybe even more meaningful. Let’s face it, in the end we’re trying to tell personal stories, express emotions and convey feelings…….with pictures.
Yep hard to believe my son is 30 years old, taking a bit of chill time in the coffee shop, the pic has been treated to some selective blur and subtle edits. I really do love the way that the DNG files work as monochromes.
My son Aaron and his partner Jain on his 30th Birthday, this is a TLC-DNG image (you’ll need to buy the book if you want to know about TLC), its taken in full harsh sunlight but the file has edited beautifully and really it looks rather film like. The simulated depth of field certainly adds an extra dimension to the image.
For me the addition of the DNG option for shooting on the iPhone was a huge deal, it opened up an array of options that just weren’t possible with the JPEGs but more importantly, it provides me with files which are nowhere near as brittle and “vastly more editable”.
Now I don’t expect my iPhone or any smartphone to be a paragon of technical excellence but that doesn’t mean it has to be technically hopeless either. The DNG option has expanded the iPhone’s capabilities and turned it into a potentially far more serious photographic tool and one that’s definitely far from a technical disaster.
Longtime iPhone shooters will know exactly what I am talking about with respect to the JPEGs…poor highlight retention, no fine textural detail, watercolor rendering at anything above minimum ISO, rampant banding of blue skies, weird hue shifts on skin tone highlights, we’ve all seen these problems. iPhone images don’t have to be like that, with DNG everything can be soooooo much better!
I like to edit my iPhone pics, and even edit them to quite serious levels. I want to make blow-ups if the image is nice enough, I want to crop, I want it all, regardless of what camera I take the photos with.
Yes, of course I could use one of my other cameras, but then I don’t normally take a camera kit to the coffee shop or out to a family dinner, or most places in fact, but I always have my phone.
My wonderful Grandson Milton, apple of his Poppies eye, isn’t he just beautiful. Taken with window light using UniWb DNG and then DOFsimm’d to taste. The image prints superbly well.
I realize some people might say, look, Brad, you could get that shallow DOF and big blow-ups with the pics with your Sony Nex, your Olympus OM. Well, sure I could if I had those cameras with me at the time.
I don’t shoot zillions of pics, I’d rather shoot just a few select images, editing them into what I want is pretty quick and relatively painless and just because photos are shot on an iPhone doesn’t mean they need to look half-baked.
Back to that DNG stuff, there’s much to love about it, but for me, the two most important aspects are the increased highlight tonality and the ability to have the fine textural information in the photos preserved. I know Apple likes to kill noise stone dead so it looks all peachy when the average punter zooms in for some pixel peeping fun but seriously that “wrapped in plastic” look just doesn’t cut it for me. I have a healthy relationship with noise anyway, we can both get along quite nicely, I’d much rather be given the choice between going plastic or analogue thanks very much.
Basically, the DNGs allow for a more 3D like rendering, being able to hold those near white tones makes the images look far more organic and the increased textural detail adds more shape and form to surfaces and this is evident even without any serious editing.
Back to the editing front, I just love that I can push the tones around in DNG without getting that horrible tonal breakup that seems to afflict most iPhone JPEGs, want to vignette a bit, lighten a shadow, dodge some skin tones, burn some highlights, no problem it all just works much better.
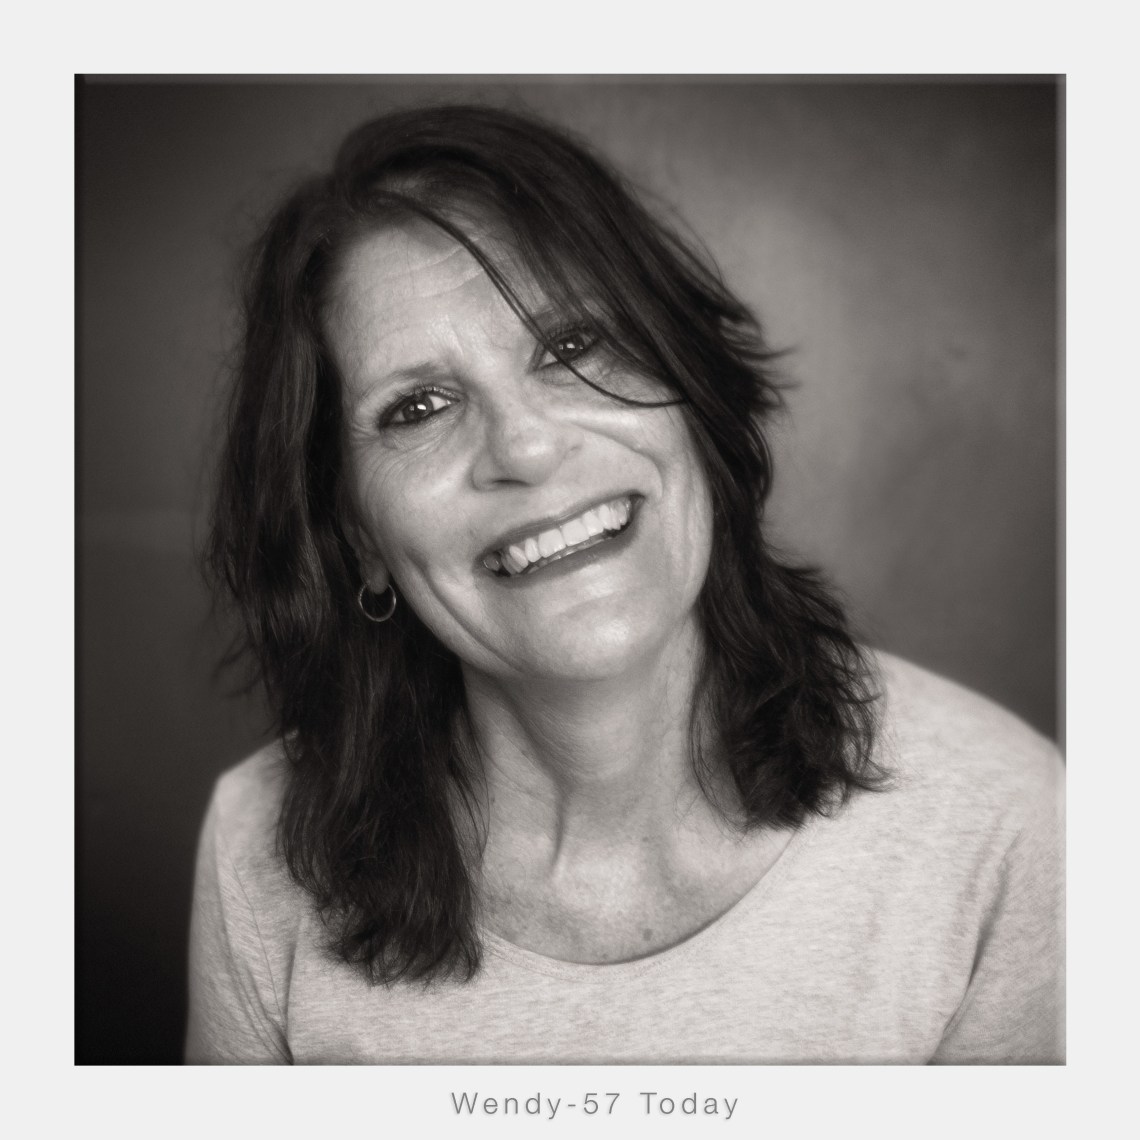
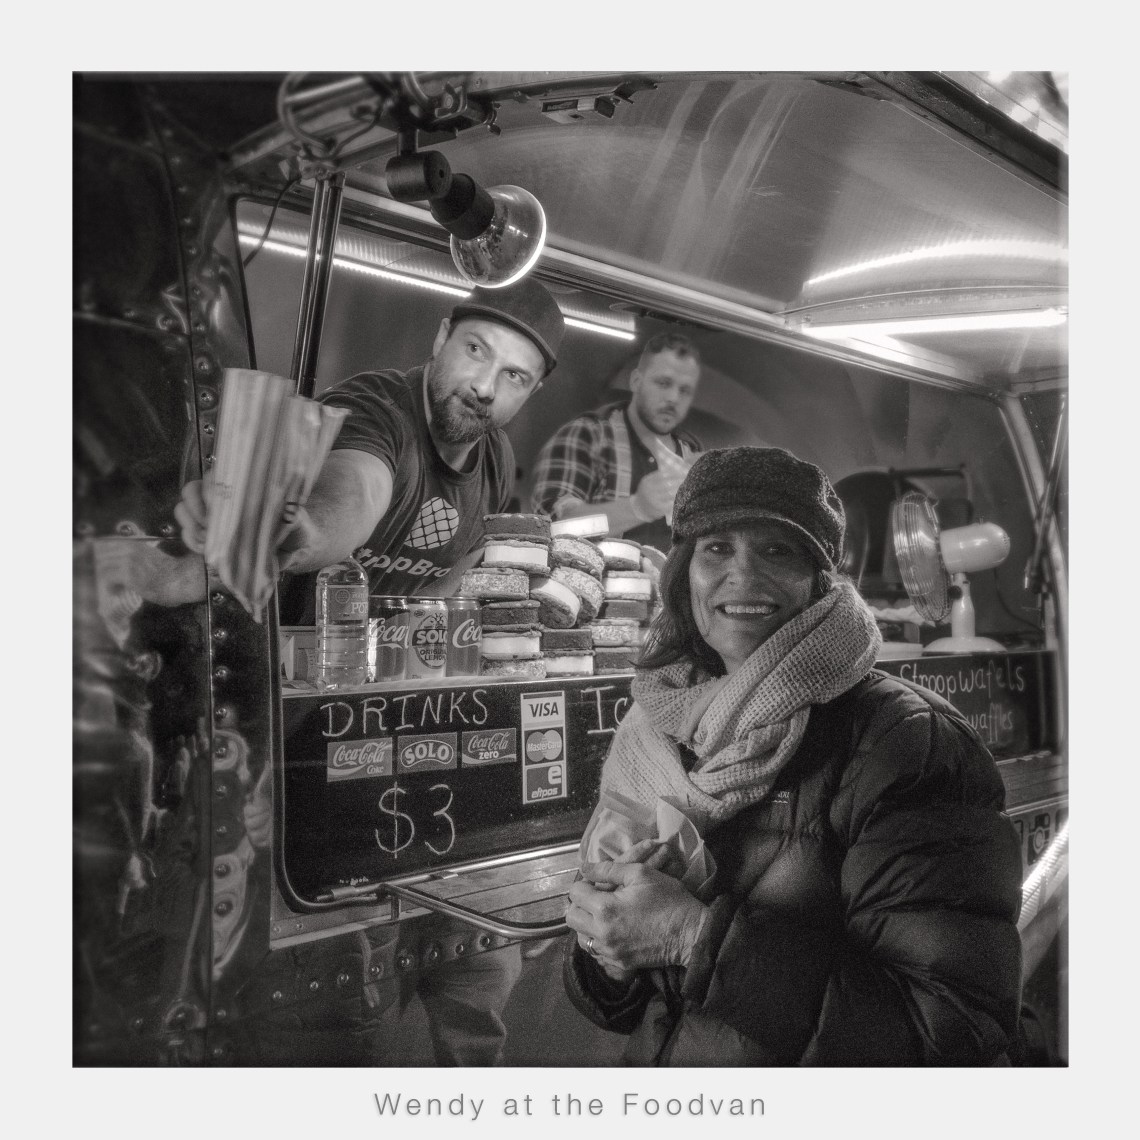
Wendy, the love of my life, we’ve been together for 40 years, this little snap was taken in one of our favourite coffee shops, it was inside and under dim light but the DNG option made the most of it. I love that smile even after all these years.
What really gets me excited is when I want to create depth of field effects. I realize a lot of photographers will get more than a bit uppity about this, thinking it’s sort of cheating by denying Olympus of the opportunity to sell me a very nice 25mm f1.2 for my OM camera to do this all automatically for me. (Olympus are about to tempt me with three more very fast f1.2 lenses I believe, I feel movement in of the wallet in my pocket)
Honestly, though I actually have some solid creative reasons for sometimes taking this simulated DOF approach and anyway isn’t this approach much the same as what Apple is already doing with the iPhone 7S Plus and other makers on the cutting edge of experimental camera technology are trying to achieve.
Consider this, with a bit of work I can pretty much get any sort of effect I want, bokeh effects are adjustable, depth of focus controllable, field curvature can be simulated and lot’s more. Fact is I often DOF sim with shots taken at say f3.5 on my regular cameras instead of going down the ultra shallow DOF shooting route, we have choices as they say.
The big advantage with the DNGs for the all this Doffy Sim stuff is that the “in focus areas” are just, well… more in focus. Details are more resolved and they respond far better to a wide array of post-shot sharpening processes, like ultra fine radius sharpening, high-pass filters, noise texturing and more. I look at it this way, it’s always possible to blur sharp bits but it’s not possible to get sharpness out of blur. So starting with a sharp image with a more extensive depth of field and selectively blurring can often be more successful that staring with one with marginal overall sharpness and then trying to add detail back that was lost due to technical depth of field limitations. You’ve probably gathered I’m not a big fan of the “6 eyelashes and half an eyeball in focus” look, but I know lots of folks are…which is fine.
I must point out that I would not attempt any of this Doffy Sim stuff on the iPhone itself, any of the apps I’ve tried to use for these effects are just plain horrible, basically, they lack the fine control you need and it’s just really hard to do on such a small screen. All that said my new iPad Pro is a different beast altogether.
Note: If you do know of an iPhone app that really does this DOF sim stuff well I’d also love to know about!
Lightroom mobile has proven to be a brilliant editing app for dealing initially with the DNGs, I remain seriously impressed be just how good it is. Using Lightroom in conjunction with Snapseed for fine tunings and effects provides a killer family pic combo. Honestly, the two are just a superb for most needs and it’s utterly amazing that neither will even ask you to remove your wallet from your pocket!
Note that I wouldn’t use either for simulating Depth of Field effects, that’s always down in Photoshop but Snapseed can do some passable simulations if you use the layers functions.
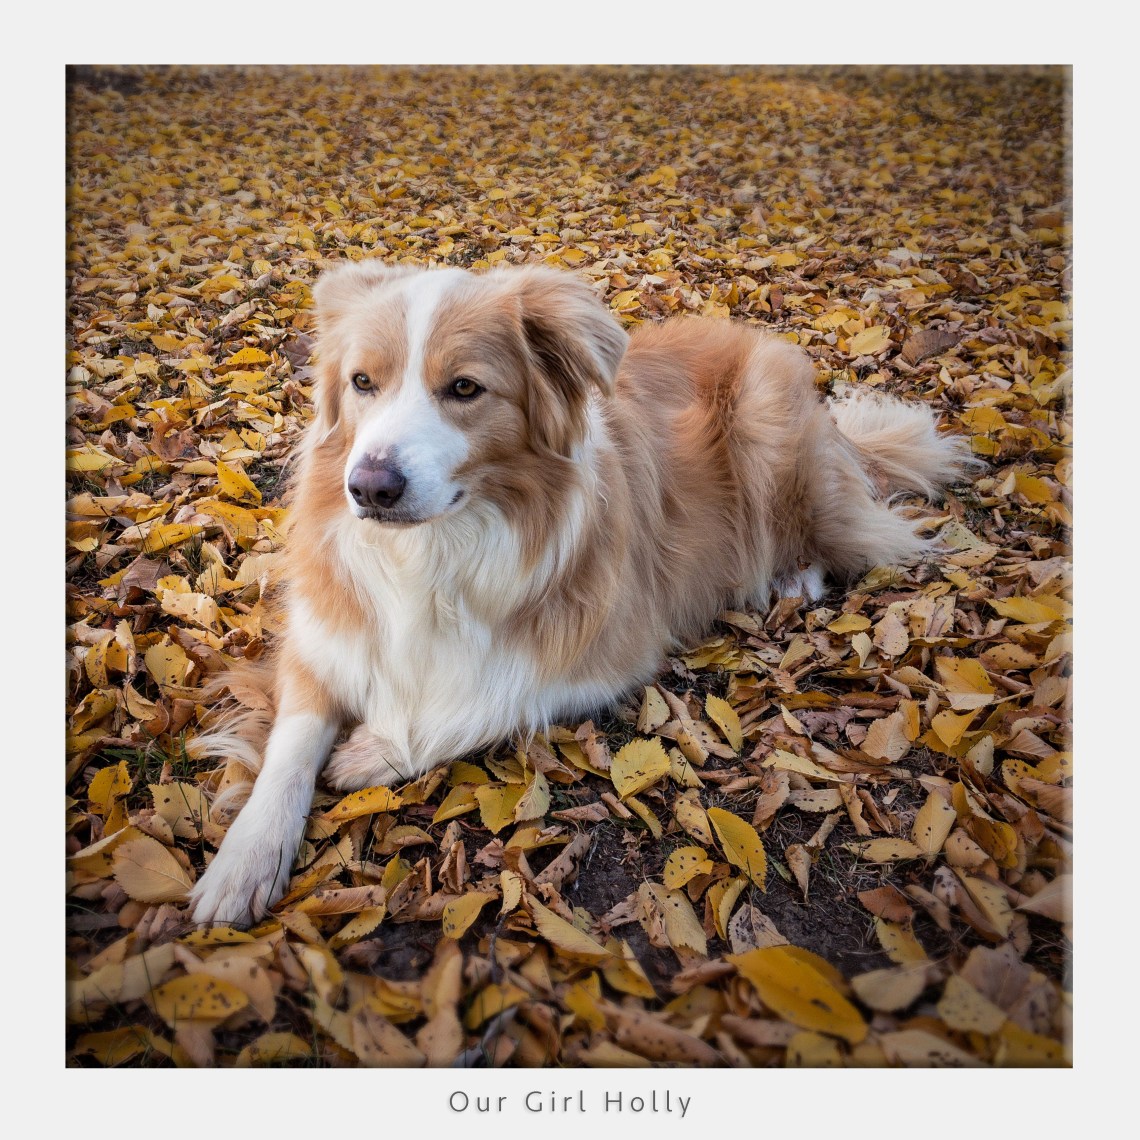
Our little girl, Holly the Collie, frankly she is far too smart for her own good, but she looks a treat in the Autumn leaves and the DNG is quite excellent at fully recording the subtle whites in her coat.
Ultimately I take a sort of hybrid approach with the family and friends iPhone snaps, I shoot in DNG, do an extraction in Lightroom mobile, follow it up with some tweaking in Snapseed and then hand it on to my family and friends via airdrop or email if they don’t have the airdrop option. It normally takes about 4 mins, not instant, but quick enough. Later on, if I decide I like the pic enough I’ll airdrop the pre-edited JPEG to my trusty Mac and give it some Photoshop time. I then re-send the newly cooked result via email to my family and friends.
I don’t normally process family and friends DNGs on the desktop but for some more serious holiday or commercial shots where I want ultimate quality, I’ll cook them in one of my RAW editing programs, usually Iridient Developer, which provides for some serious image quality that will utterly belie the iPhone origins. (yep, that’s all covered in one of the upcoming books)
In the end, the only thing that I find a bit limiting with the iPhone for family and friends snaps is shooting under really low light (though DNG helps a lot) and the lack of a more telephoto lens. The standard wide lens does kind of apply its own perspective look to shots, but I’ll upgrade to the new dual-lens iPhone 8 later in the year so that aspect will probably cease to an issue for me.
By rights this should be just about an impossible shot, taken under very low light handheld at 1/40 sec, Wendy was actually very strongly backlit with the exposure set to record the highlights, yep it’s a bit grainy but it’s nice grain and I truly treasure this shot, a great reminder of a lovely but very cold evening we spent with some friends out on the town. Of course its DNG, a UniWb version in fact.