iPhone X tele lens part 2 the Raw truth

Most people reading this will be familiar with the specs for the iPhone X tele lens, but just in case you missed them, here they are.

  • 6 Elements
  • 56mm equivalent
  • 12 megapixels
  • Fixed Aperture f2.4
  • Image stabilised
  • Autofocus via focus pixels
  • Body and face detection

Note 1:  It has not been possible to find a final spec on the sensor dimensions or pixel size. However, all information from Apple and my own tests indicate it is superior in all ways to the sensor in the iPhone 7 models.

Note 2: The sensor in the 8 and X models may be the same with only the lens and image stabilisation being different, though Apple has indeed hinted that the X version is superior. Hopefully, I can provide a definitive answer to this in the third part of the series when I compare the two with real-world images.

Note 3: No portraits in this article, yes I know lots of people will use this lens for portraits, but they tell you next to nothing about chromatic aberration, edge performance, cross-field resolution etc.  Check out the previous article if portraits are your game.  Anyhow lots of people will use the tele lens for all sorts of regular images, so this is for you folk.

A Request: If anyone really does know the exact sensor size I’d be keen to know also as it will help me to calculate exactly how the depth of field pans out, please drop me a line. I can make some estimations based on the focal length, but I don’t know for sure that the reported 6mm of the X tele lens is precise either.

This review of the iPhone X tele lens only uses RAW/DNG files, no jpegs, basically I want you to see what the lens/sensor module is really capable of.  JPEG shooters will not obtain the same results, but I assume you already knew that.

The files were captured via ProCamera, but the results should be pretty typical of what’s possible via any decent app capable of DNG capture. Test files were processed in Iridient Developer on my Mac or Lightroom CC on my iPhone X

Remember that RAW/DNG files can be adjusted to provide pretty much any colour rendering or white balance setting you desire, so stating that the RAW files produce a more mellow colour is meaningless, it all depends on how you choose to cook the files’ ingredients.

Ok, let’s dive into the good stuff.

Track repair machine at Coolamon railway station NSW, taken iPhone X using telephoto lens, wide tonal range with rendered highlights and shadows.
TLC image (see note at the end of document), Track Repair Machine in Coolamon NSW. This is an extreme contrast situation, yet the file holds information from deep shadows through to bright sun-bleached whites, it is also very highly resolved.


Resolution

Many photographers get hung up on resolution and judge a lens purely by how much detail it can record, I find that approach a little simplistic but for all you pixel peepers, the answer is yes.

Yes, what?

Yes, this iPhone telephoto lens resolves very nicely indeed.

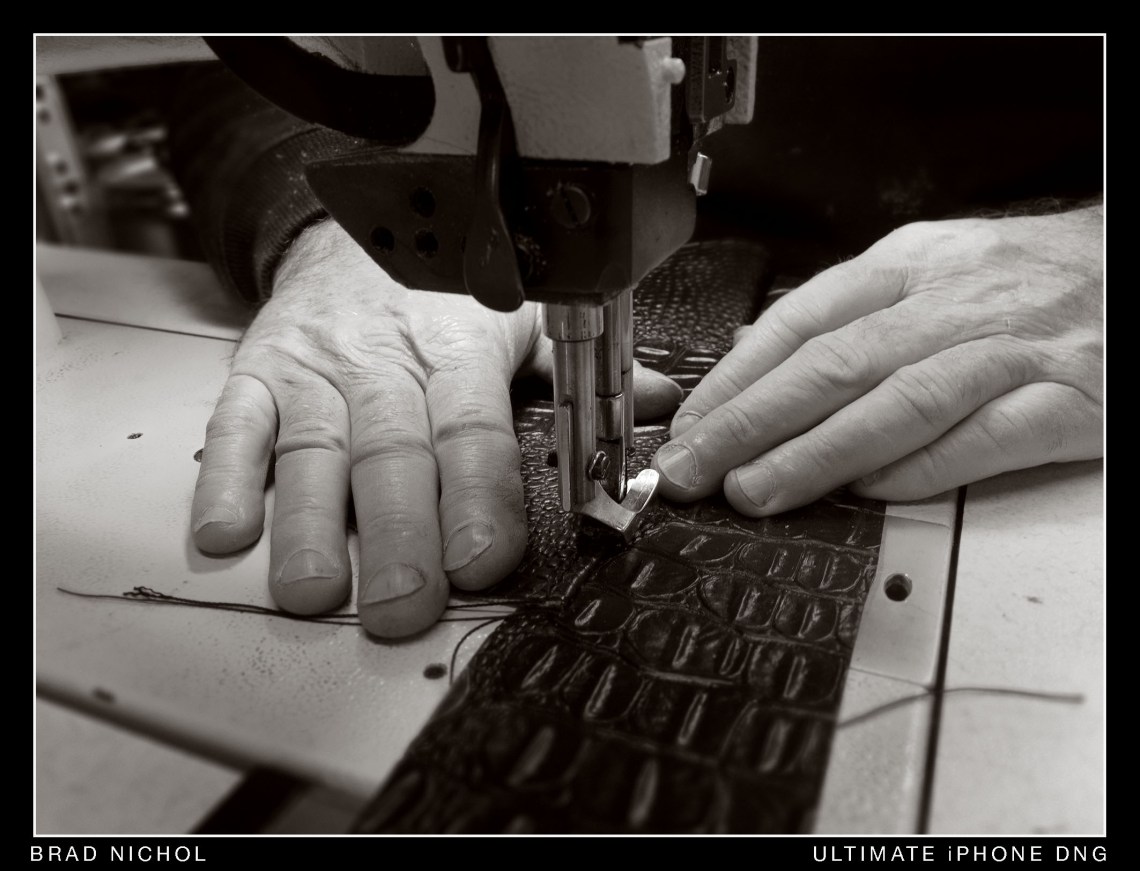
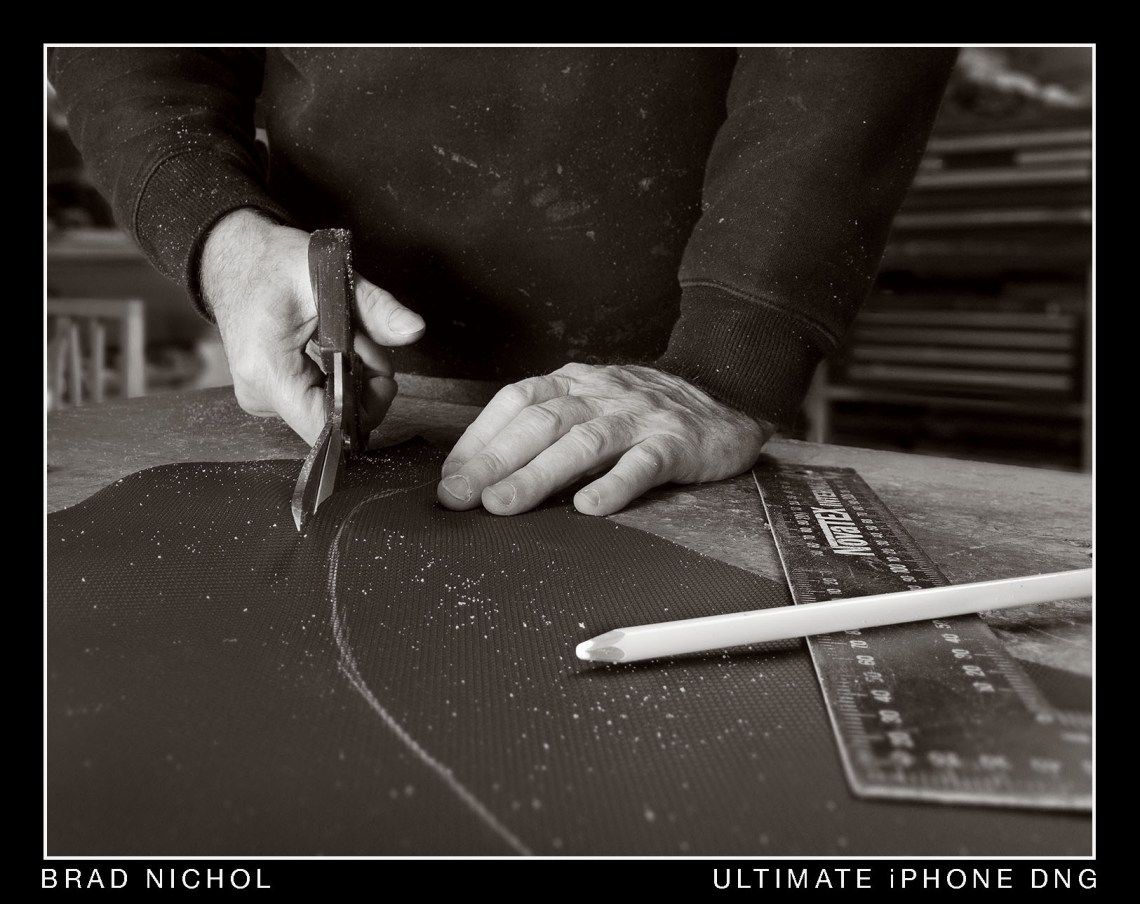
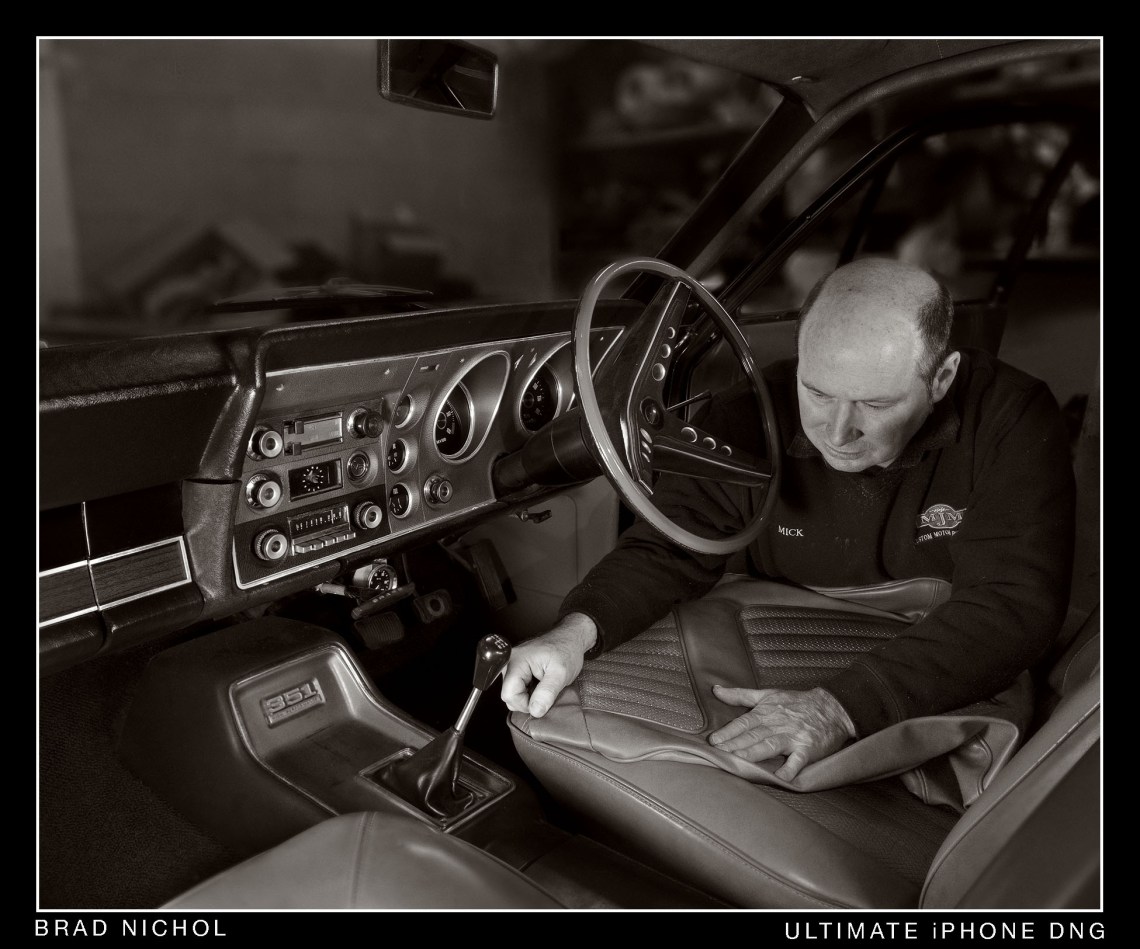
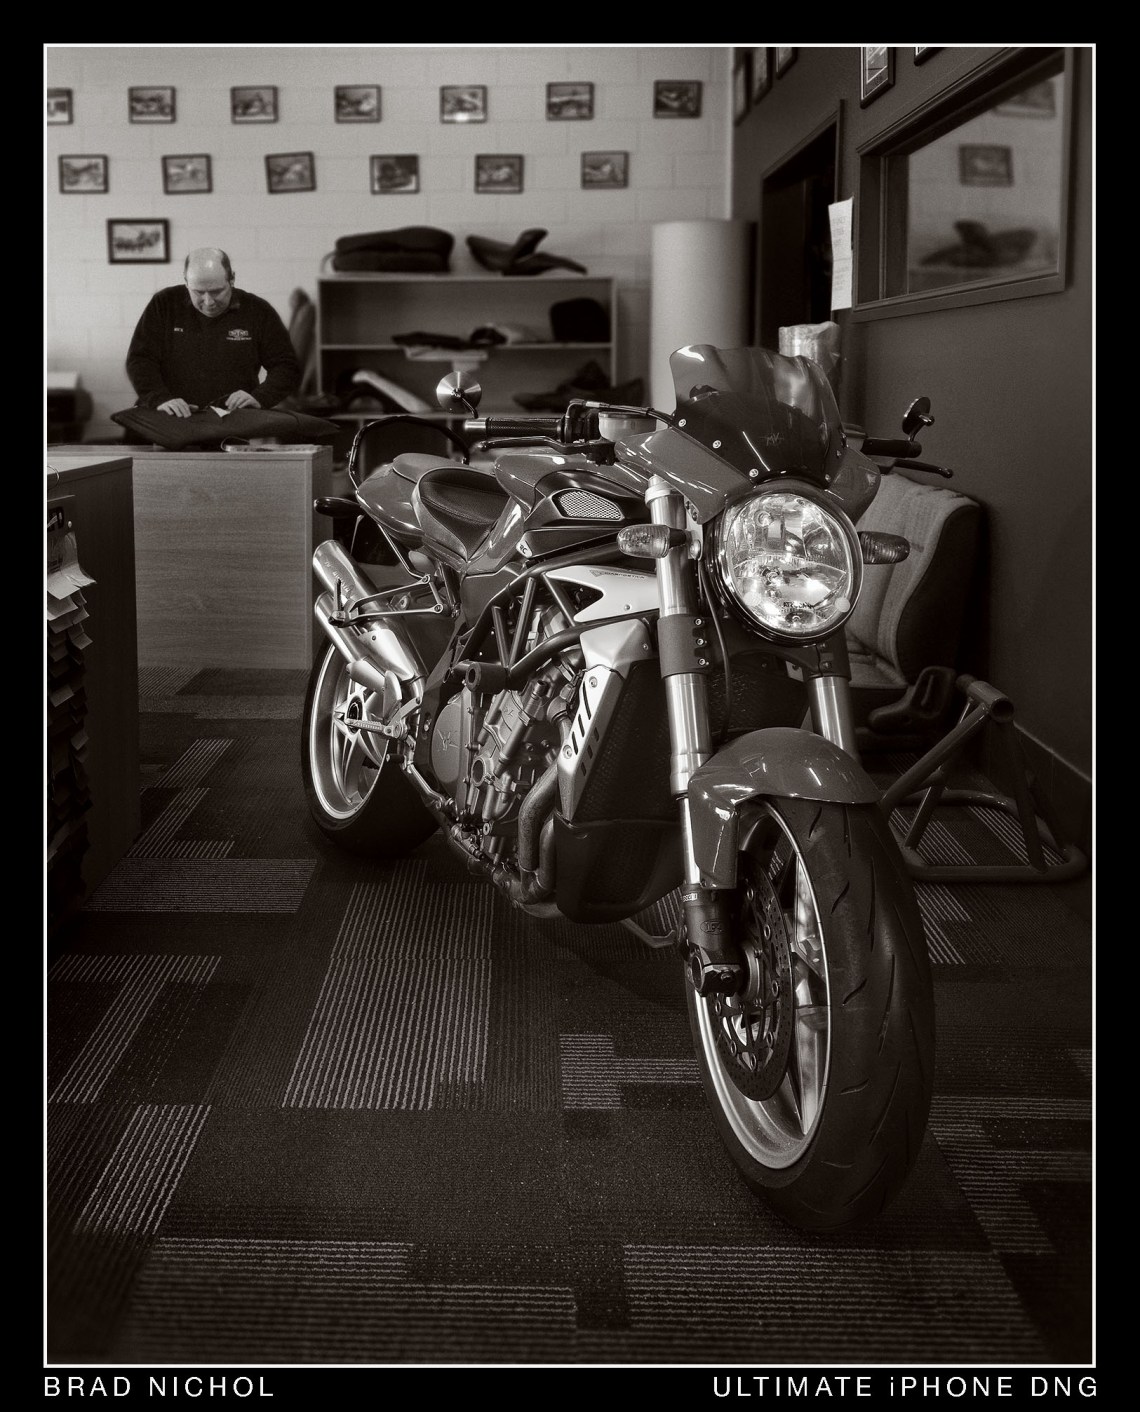
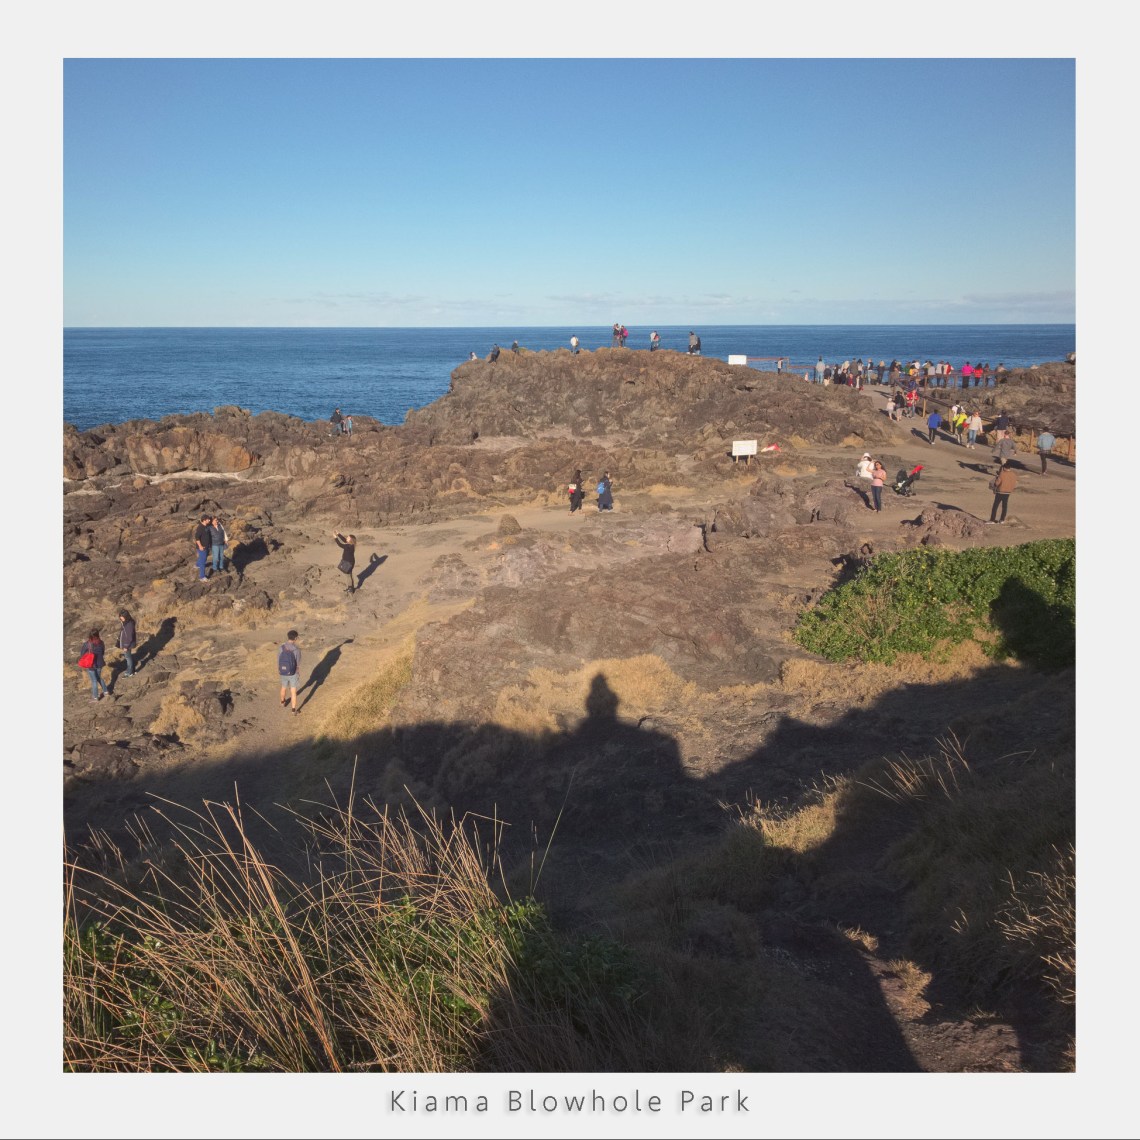
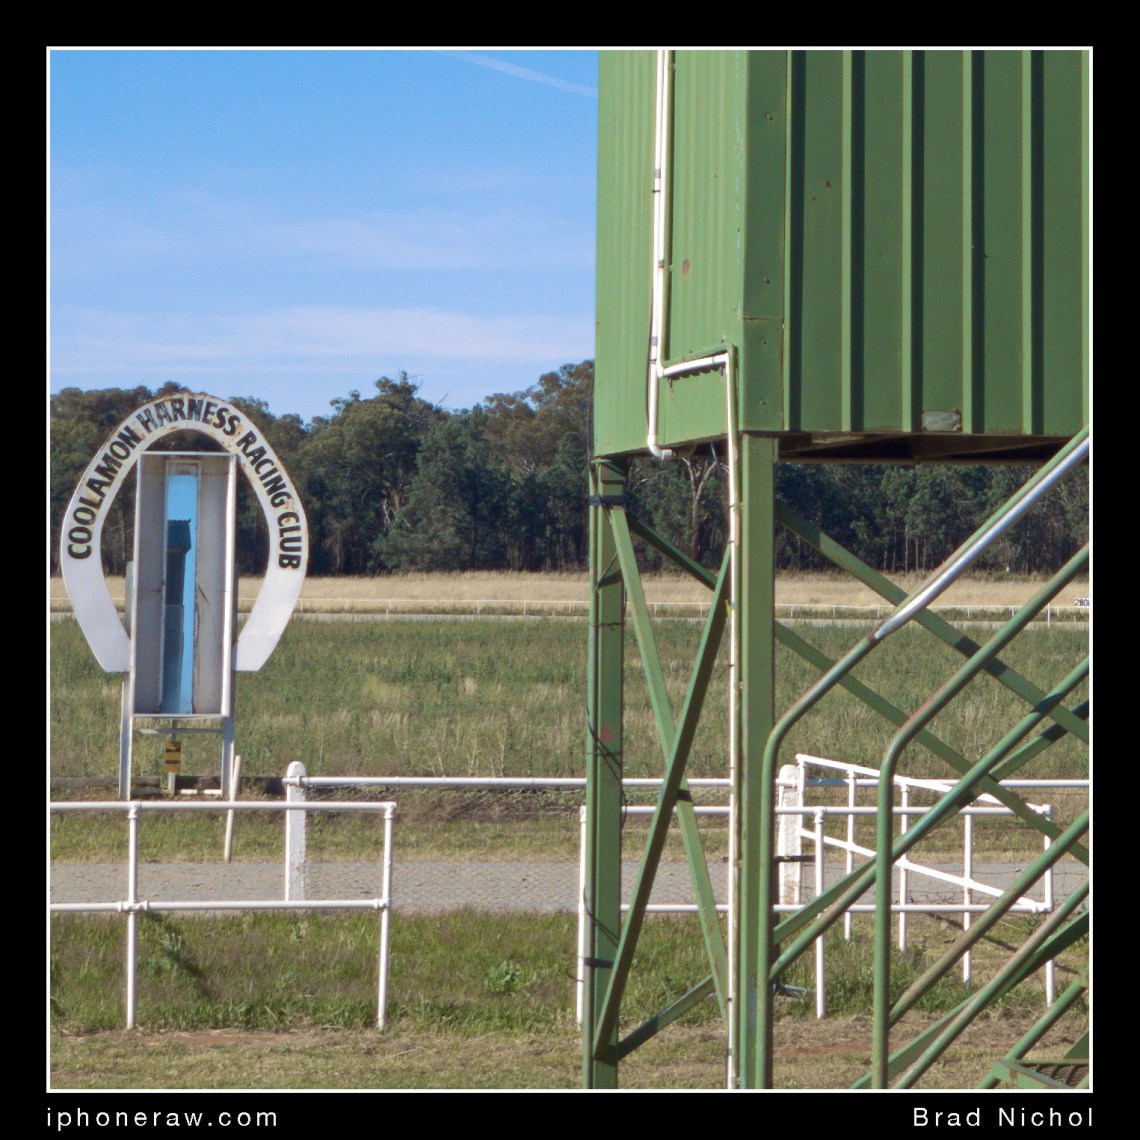
To judge resolution, I take several photos of real-world 3D subjects; I certainly don’t go shooting flat charts, brick walls and printed artwork.  Testing lenses in this way doesn’t tell you much at all unless you’re working with macro lenses. It quite surprises me that people would think that close up flat field subject rendering is a credible way to test a lens at all, anyhow, we have lots of photos at varying distances of real-world stuff here.

Next, all the tests have to be done in DNG (RAW); otherwise, I’d be just testing the JPEG processing of the device rather than the optics and sensor.

I shoot at the lowest ISO to ensure that if the device is adding noise reduction to the file, it’s minimal and also so I can get the best result in the RAW converter.

I check the files out using Iridient Developer with all noise reduction turned off, I also post-edit the extracted files in Photoshop to determine their malleability.

I try to find the interpolation algorithm that works best for the file at hand, Iridient Developer offers several options, they give slightly different results and looks. In the case of the iPhone X files, V3 Ultimate and V3 Detail+ seem the give the best results.

Finally, I view the image at different percentages, 200, 100 and 50%

So moving on, what have I found?


Goulburn railways station, standard test shot by Brad Nichol, iPhone x tele lens, wide tonal range, shows high performance result.
UniWB captured shot at my standard lens test location. Even in this web-sized image the even edge to edge-definition, wide tonal range capability and solid resolution are obvious enough. This location really tests the mettle of a lens and camera with the combination of high scene contrast, fine details and straight lines. In short, the iPhone X Tele passes muster with flying colours with no excuses.


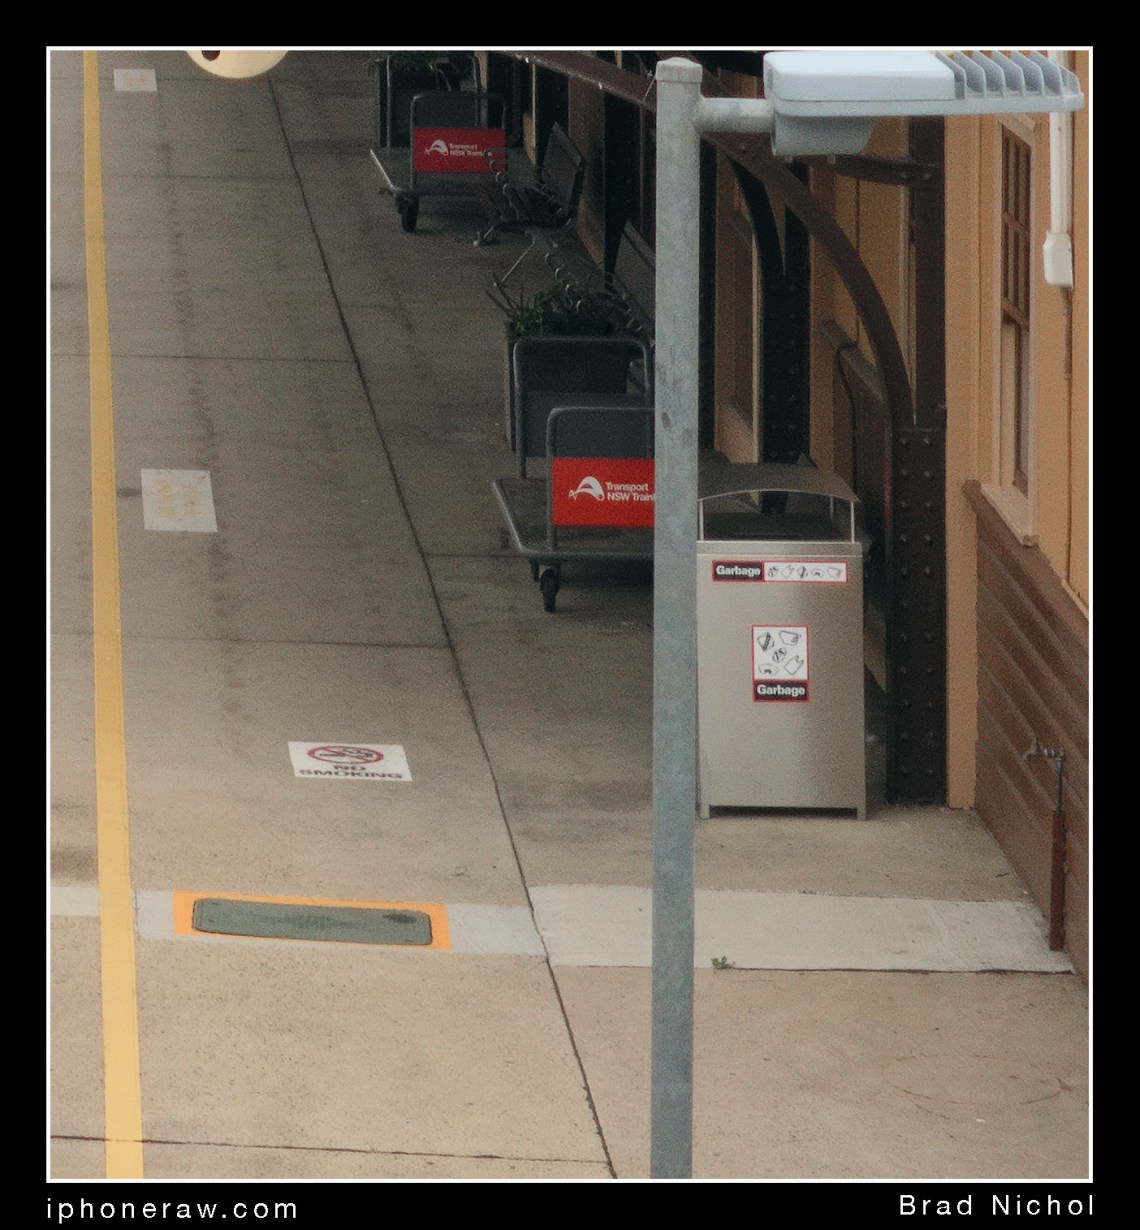
The central resolution is about as high as you could reasonably expect for a small 12-megapixel sensor, it has no problem resolving fine textural information or low contrast detail.

I reckon if you were to look at the resolved detail and compared it with any decent 12 or 16-megapixel camera/lens combo offering the same angle of view you’d be unlikely to find anything to mark the iPhone X down on. (more on that later)

Furthermore, there is sufficient resolution to uprez to larger than native print sizes and files offer a reasonable degree of crop-ability for most purposes.
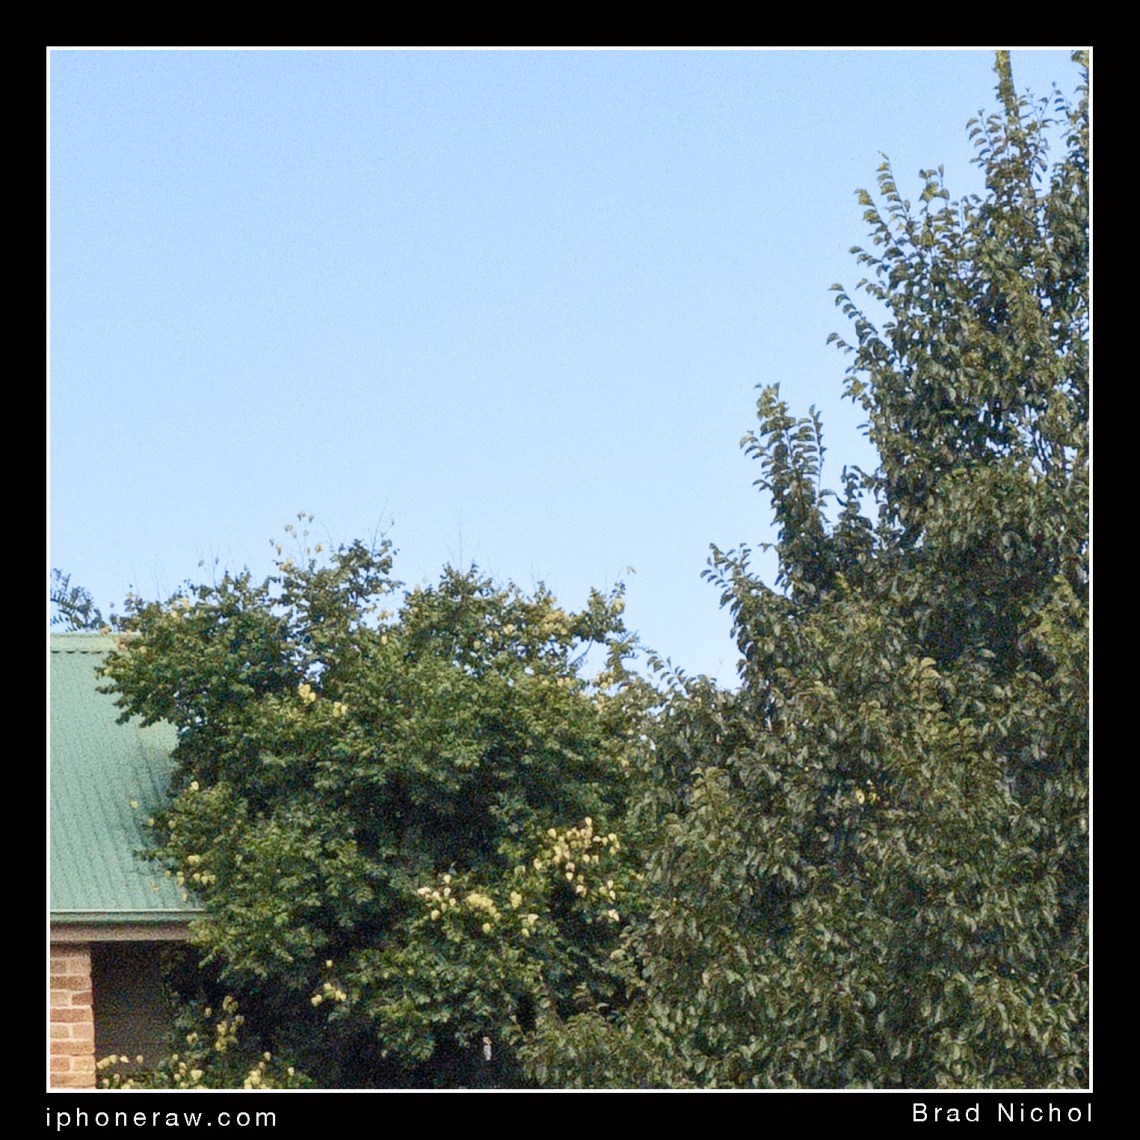
 

Edge Definition

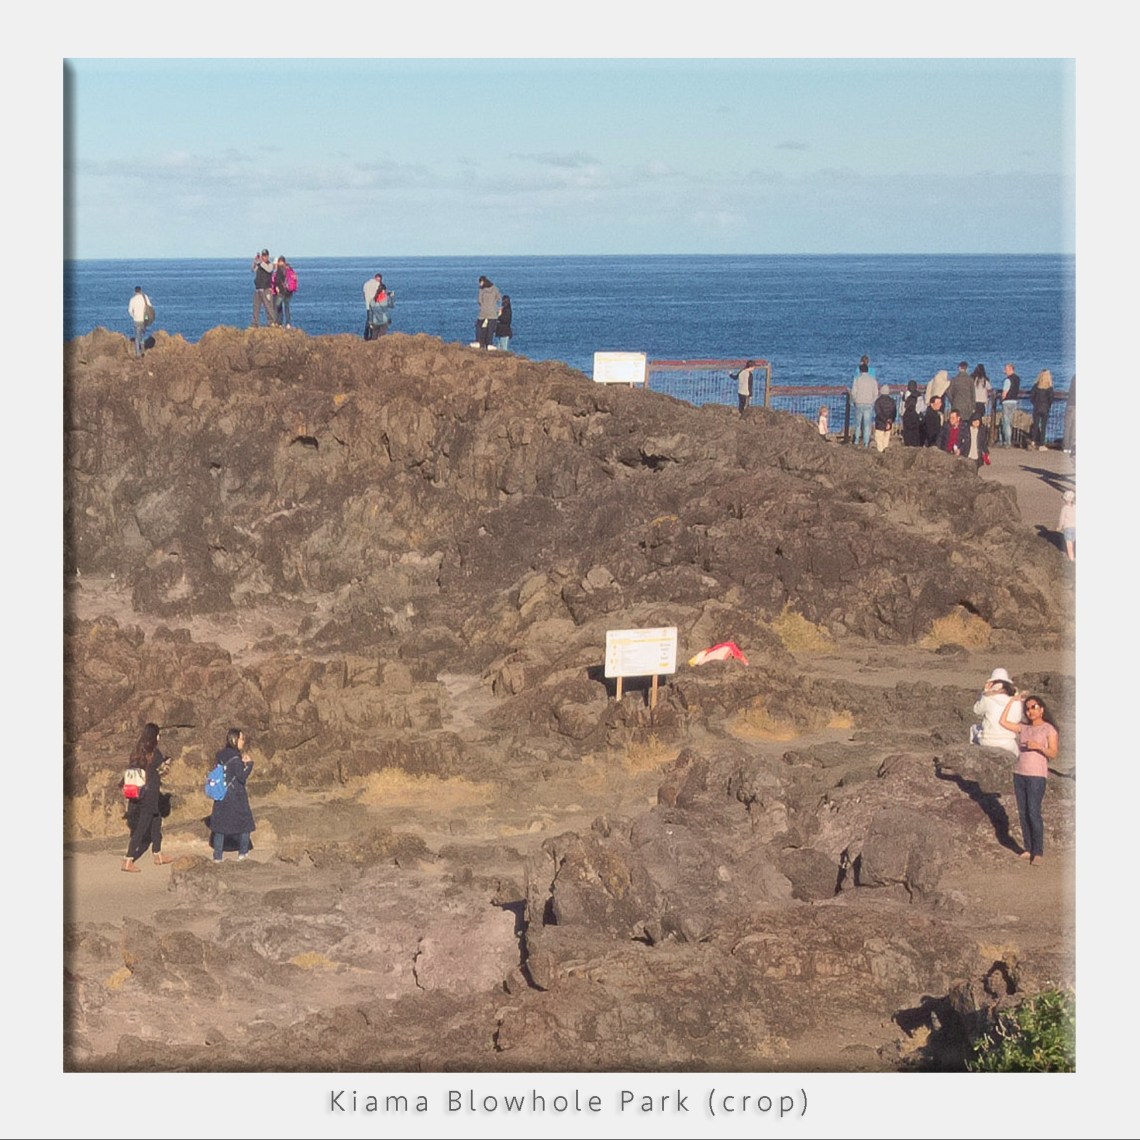
The results here are pleasantly surprising; there’s little drop off in detail as you move towards the edges and corners, I’m confident that no one is going to have an issue with soft corners for any application.

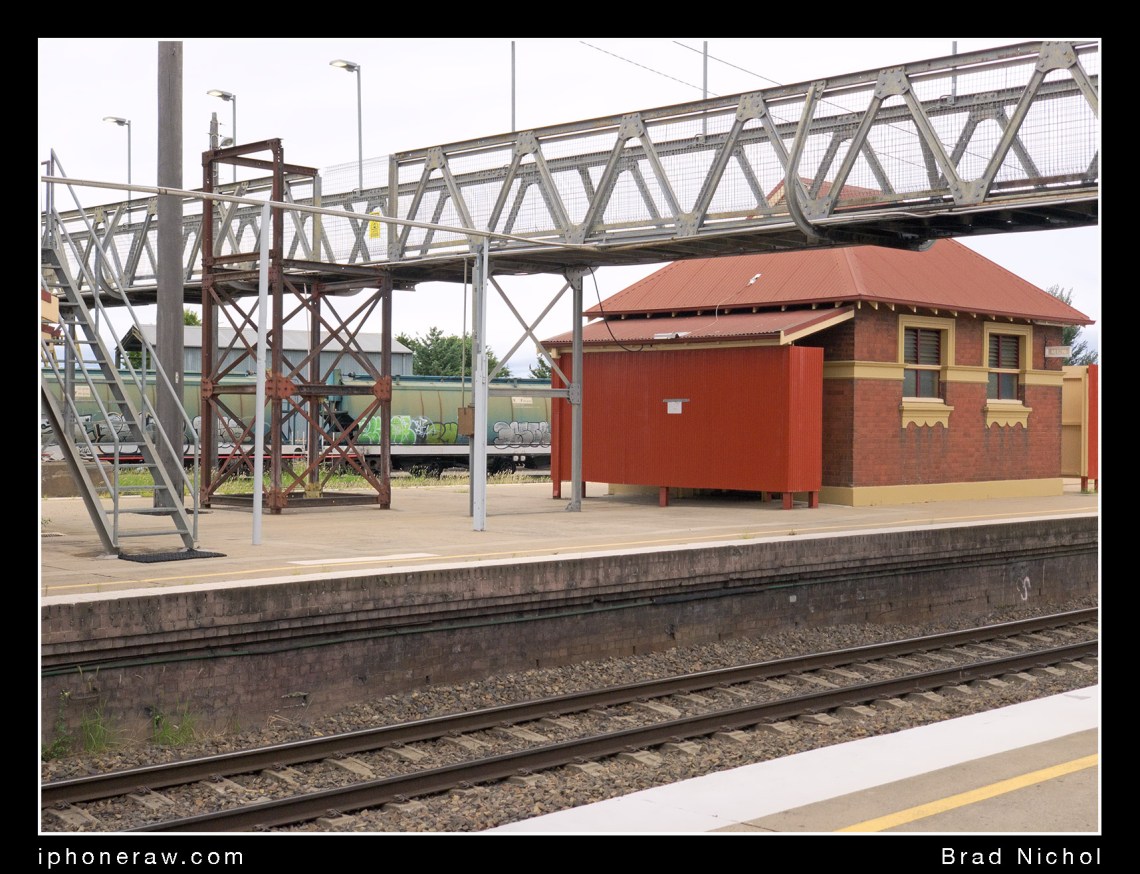
In particular, the very even cross frame resolution would make for high-quality image stitching results.

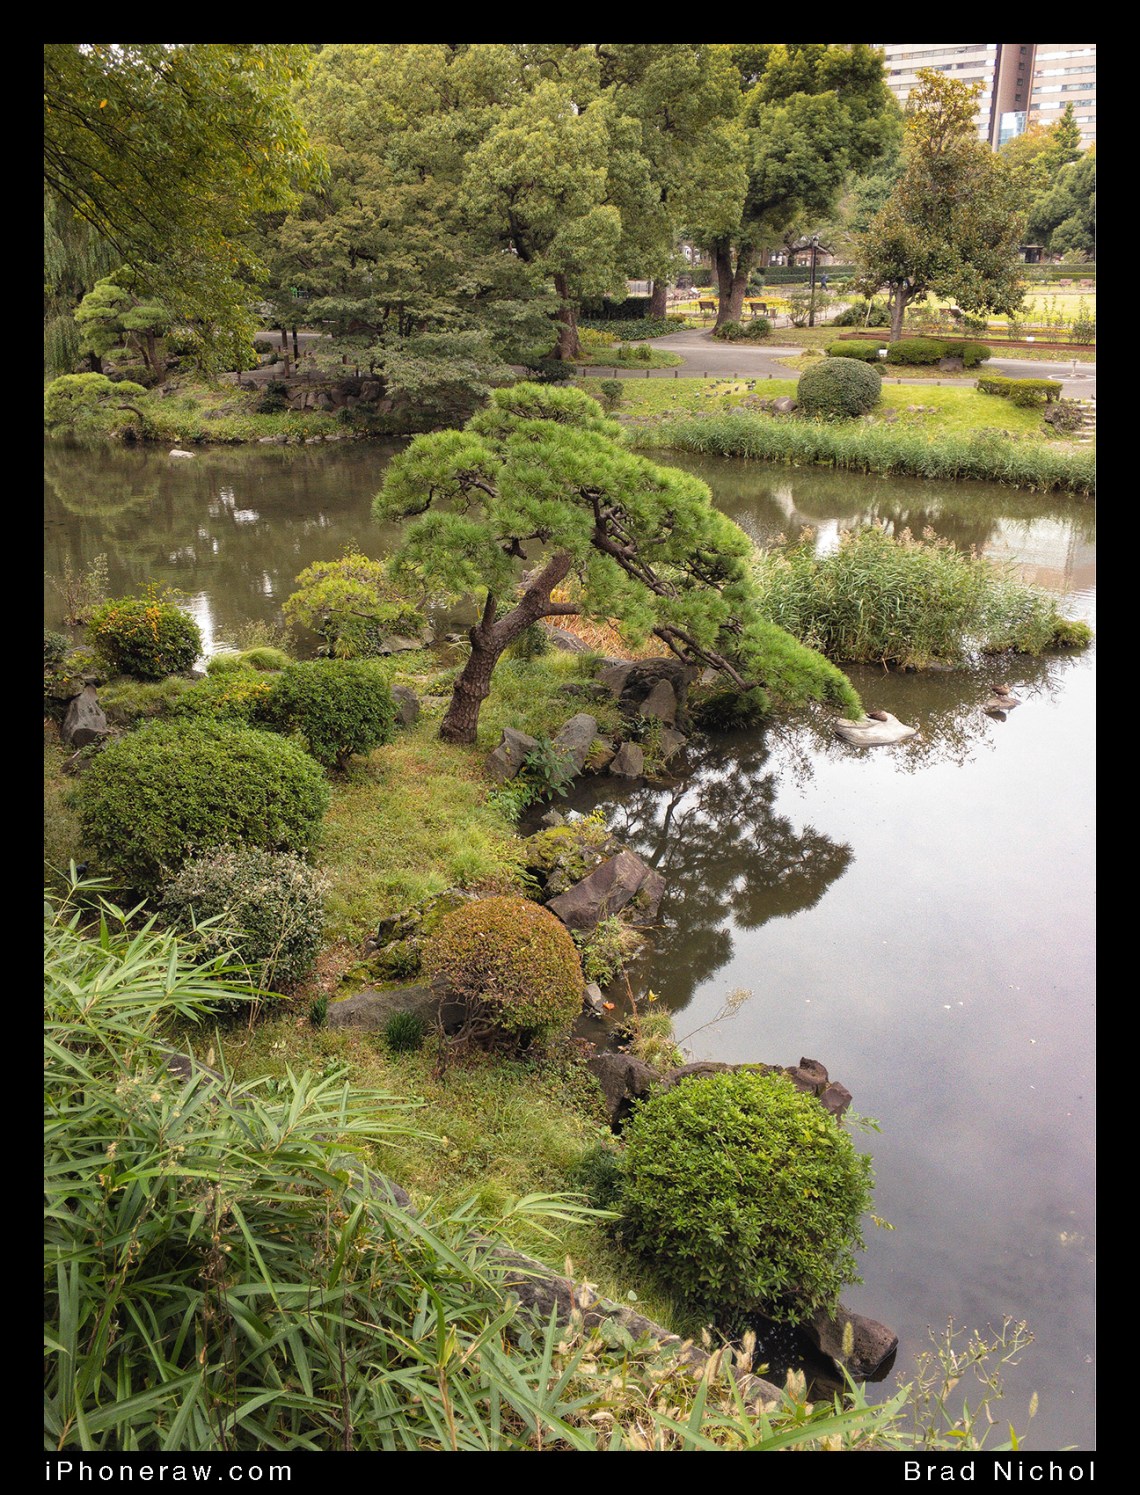
I’ve examined a wide array of images, even landscapes with very fine grass out in the corners show high resolution, the only trade-off I can see is a slight loss in corner contrast, but most of that would be due to vignetting and the resulting correction.
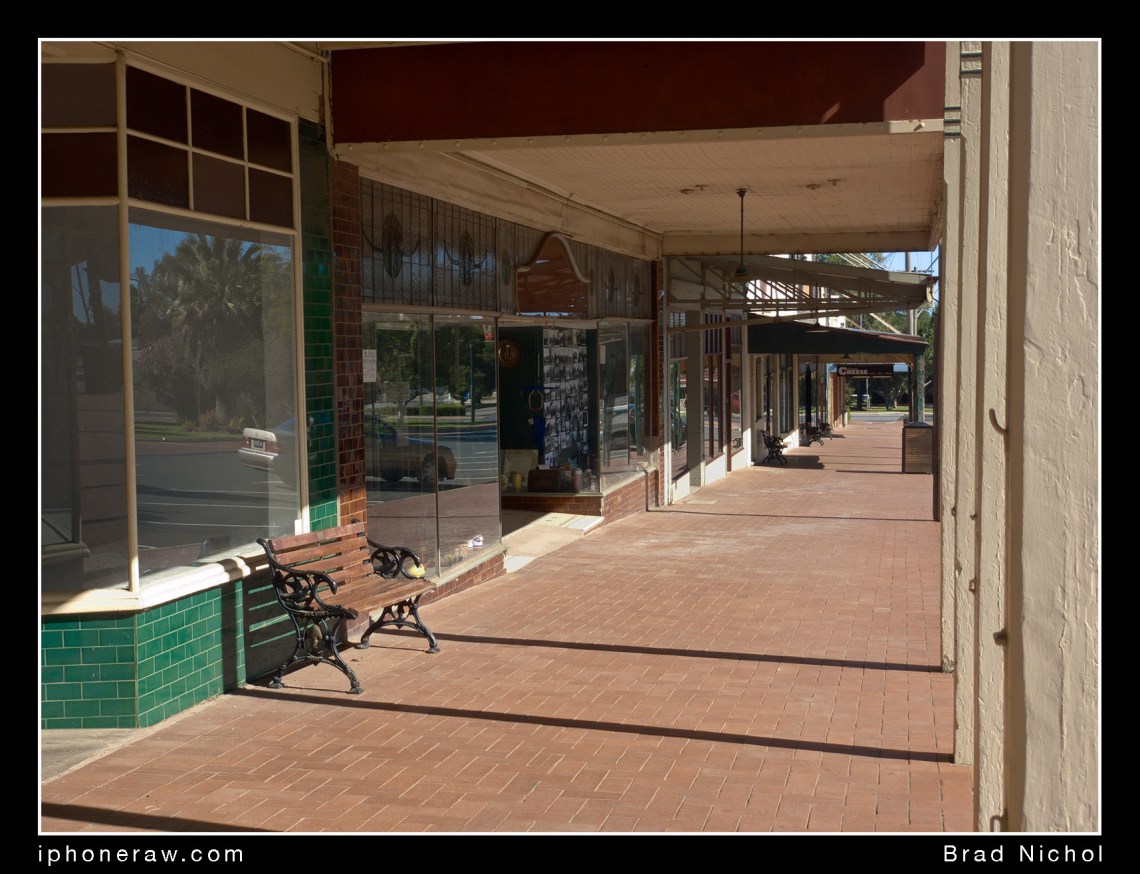
 

Green finish box on country race track, Coolamon NSW, iPhone X telephoto lens.
Another TLC frame of Coolamon Race Track in country NSW. The image was captured at 16 ISO and shows excellent detail rendering. Also evident is the high level of corner definition, there’s almost no fall-off in detail even at the extreme corners. There is some residual vignetting, but it’s not colour shifted as was the case with earlier iPhones.


Cropped image of test frame, "Coolamon race Track" showing fine detail and dynamic range under very bright sunlight, iPhone X telephoto lens module, TLC, edited image.
This crop represents a 100% of the above image (assuming you open it full size for viewing). A couple of small things can be gleaned from this, the lens and sensor has no problem resolving high levels of micro detail, the edges are pretty much as good as the centre of the frame, and you can get blooming/flare on very bright elements such as the white fence but it’s well controlled and easily kept in check by holding the exposure back just a little.


Contrast

In the dim past, many smartphone lenses showed rubbish native contrast, especially if you pointed them towards bright light sources.  This behaviour was due to a combination of poor lens coatings and the effects of the front cover glass.

Some early iPhone lenses scratched up badly after mild use. These days the front cover lens is very tough and highly scratch resistant. Additionally, the coatings seem to be vastly better.  Even when the iPhone is pointed towards light sources contrast remains commendably high, this is especially the case with the telephoto lenses on both of the new iPhone X and 8 models.

The advantage of the higher contrast is seen in the shadows, which respond nicely to editing, provided you have good exposure files can be coaxed into displaying excellent tonal gradation in the shadows.

Note, as always the lens needs to be scrupulously clean for best results, something often overlooked.  I’ve had many students who ended up with hand cream and fingerprints all over their smartphone, obliterating any semblance of resolution.  That said, the telephoto lens is a little more forgiving of dust and small levels of lens born pollution.

One nice side benefit of the newer iPhones is the better sealing of the phone and its internal workings. Older models sometimes built up dust under the front lens cover requiring a pull down to fix; I’ve not seen this on an iPhone 6 or later model, still, it’s something to look out for if you are buying a second-hand phone as it plays havoc with contrast rendering.


Goulburn Railway Station, section of test file, iPhone X telephoto les module 16 ISO UNiWb capture, fully processed.
Here is another 100% crop, this time taken from the Goulburn Railway Station short earlier in the article, there is some very fine filmic noise even at 16 ISO but it actually makes the prints and on-screen images look a little more organic, and you really need to look very hard to see it at all. Even very fine details are well resolved, and there is a world of difference between the RAWs and JPEGs in what can be extracted from the files. The light sources on the platform do not show significant flare, nor is there any substantial micro flare around white items in the scene.

Flare

Flare is closely related to contrast; any lens can be made to flare if you try hard enough, usually when shooting into the sun or towards some specular light source. Most older smartphones show horrible flare in particular when shooting against bright white cloudy skies.

It is easy to confuse flare with localised over-exposure, this often occurs with light sources.  Here the immediate area around the light source loses gradation and bleaches out, this is usually a result of the sensor design and technical limits, but it may be made worse by poor lens coatings and designs which cause internal reflections.

I really pushed the tele lens to see if I could induce flare, and frankly unless I did something idiotic the flare was a non-issue, basically specular highlights remained specular, no flare-fests were evident.

The good news is that you will get excellent flare-free results without having to shield the lens, which has not always been the case. Certainly, my previous iPhone 6S often needed a little hand shielding many situations.


Corner crop iPhone X telephoto lens, test image Goulburn railway Station
This frame is an extreme blow-up of the corner of the main Railway test image; it’s from the bottom right side. We can see the fine textural noise which really is of no consequence, but more importantly, the resolution is excellent. You’d be very picky to find any issue, and most kit lenses on regular cameras would be far less well resolved in the outer most corners.

Vignetting

It can be a little tricky to test the vignetting with iPhone Raw/DNG files, you see all of the converters will apply an auto-correction under the hood before you do any editing to the image.

Does this matter?  Yep, it does, vignetting causes flow-on effects further down the editing chain, less real vignetting makes for a more pushable file.

To see what the native vignetting is you have to remove the effect of the base profile from the image, I can do this in Iridient Developer.

I can tell you that the native vignetting level is minimal in smartphone terms and the fall off is quite even showing no sudden banding.  The extreme corners certainly show a bit extra darkening, but it’s easily corrected and unlikely to show up as an issue in real-world images.  In short, the native vignetting performance is the best I have seen from any smartphone lens I’ve tested so far.
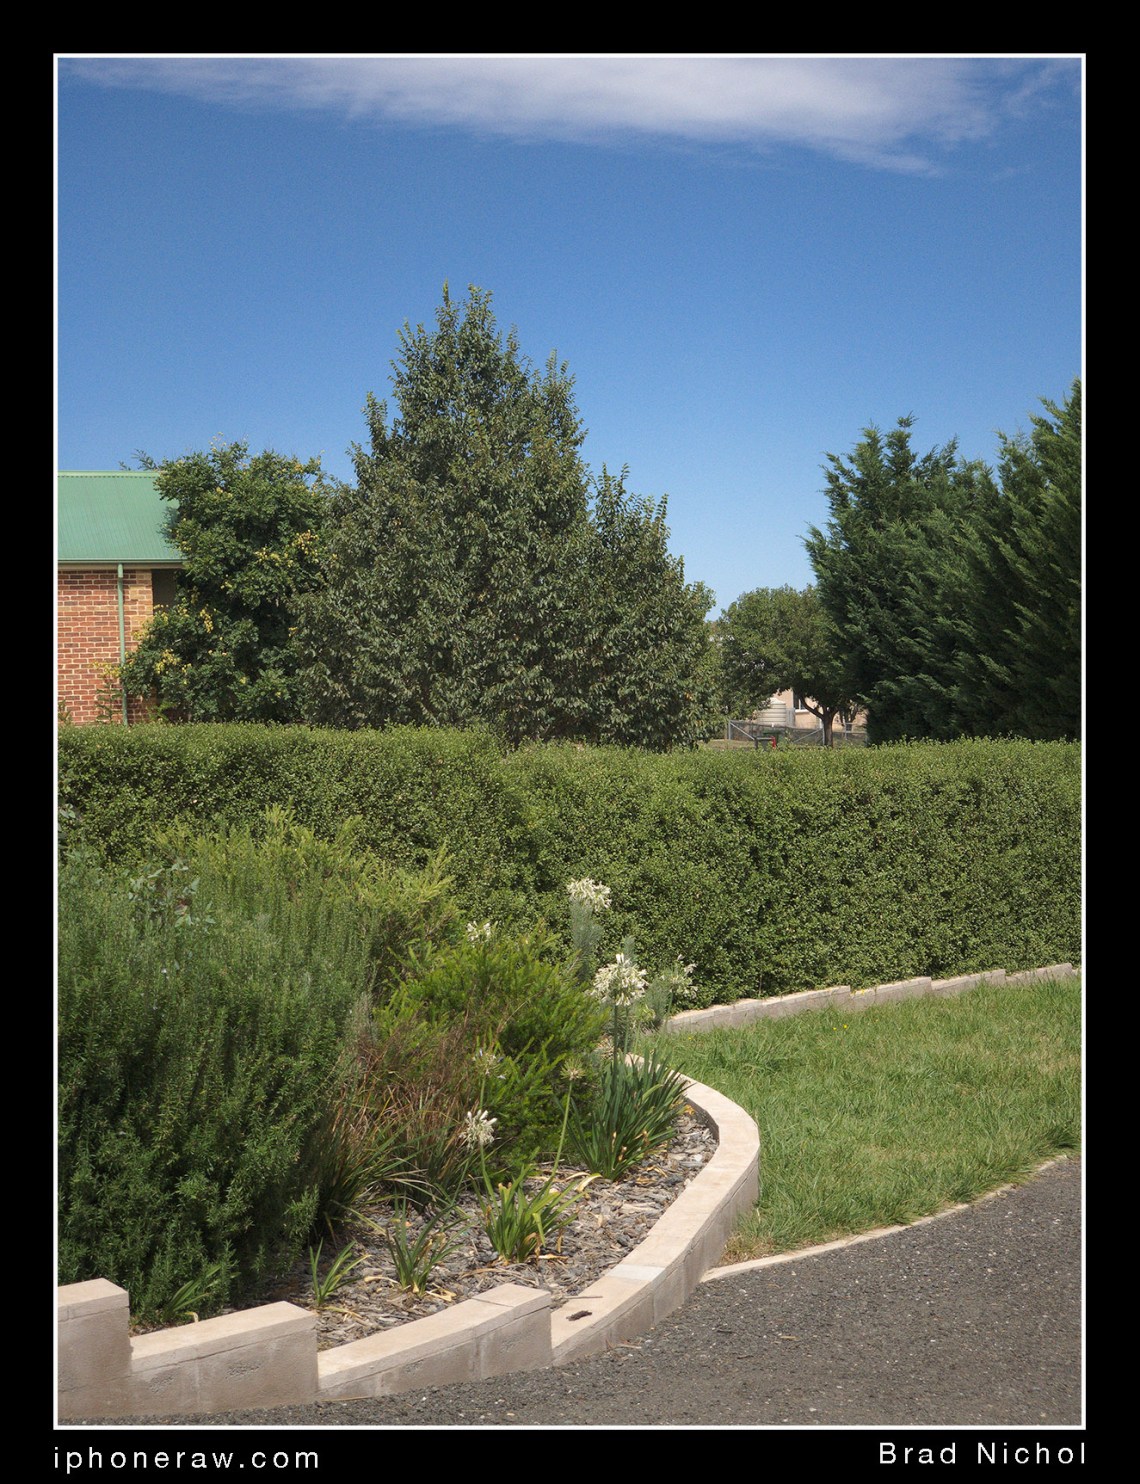
 

Colour Shift

Most older Apple smartphones in RAW show a significant red colour shift as your move towards the outer edges of the frame and this is made worse with underexposure or raising the ISO setting.

It’s not so much a product of the lens but rather a sensor issue which is exacerbated by vignetting, which of course means the exposure in the corners is always less.

You will almost never see this effect in JPEGs or indeed most RAW conversions because it’s dialled out early in the processing chain as part of the profile, but it has a flow-on effect for colour reproduction, colour noise and to a smaller degree, sharpness of the edges and corners. It can also make high-quality panorama stitching very difficult.

Naturally then, less native red-shift would mean a better-edited result.  Again the news is excellent, the Tele lens module shows minimal colour shift, you can just see it in cyan blue skies or if you have neutral greys out towards the corners. Finally, I can say the redshift is a non-issue and a big hooray for that.

Goulburn Railway Toilet Block test frame, iPhone X telephoto lens module.
This pic of the Toilet Block on Goulburn Railway Station has not had the profile that fixes the corner red-shift applied, nor has the colour been fine-tuned. The pic looks a little pink, but I don’t think many people would be too perturbed.  One side aspect of note is that the fine mesh on the walkway above the railway rendered nice and clear, the highlights of the sky have not etched into the details, this which indicate good flare control.


Chromatic Aberration

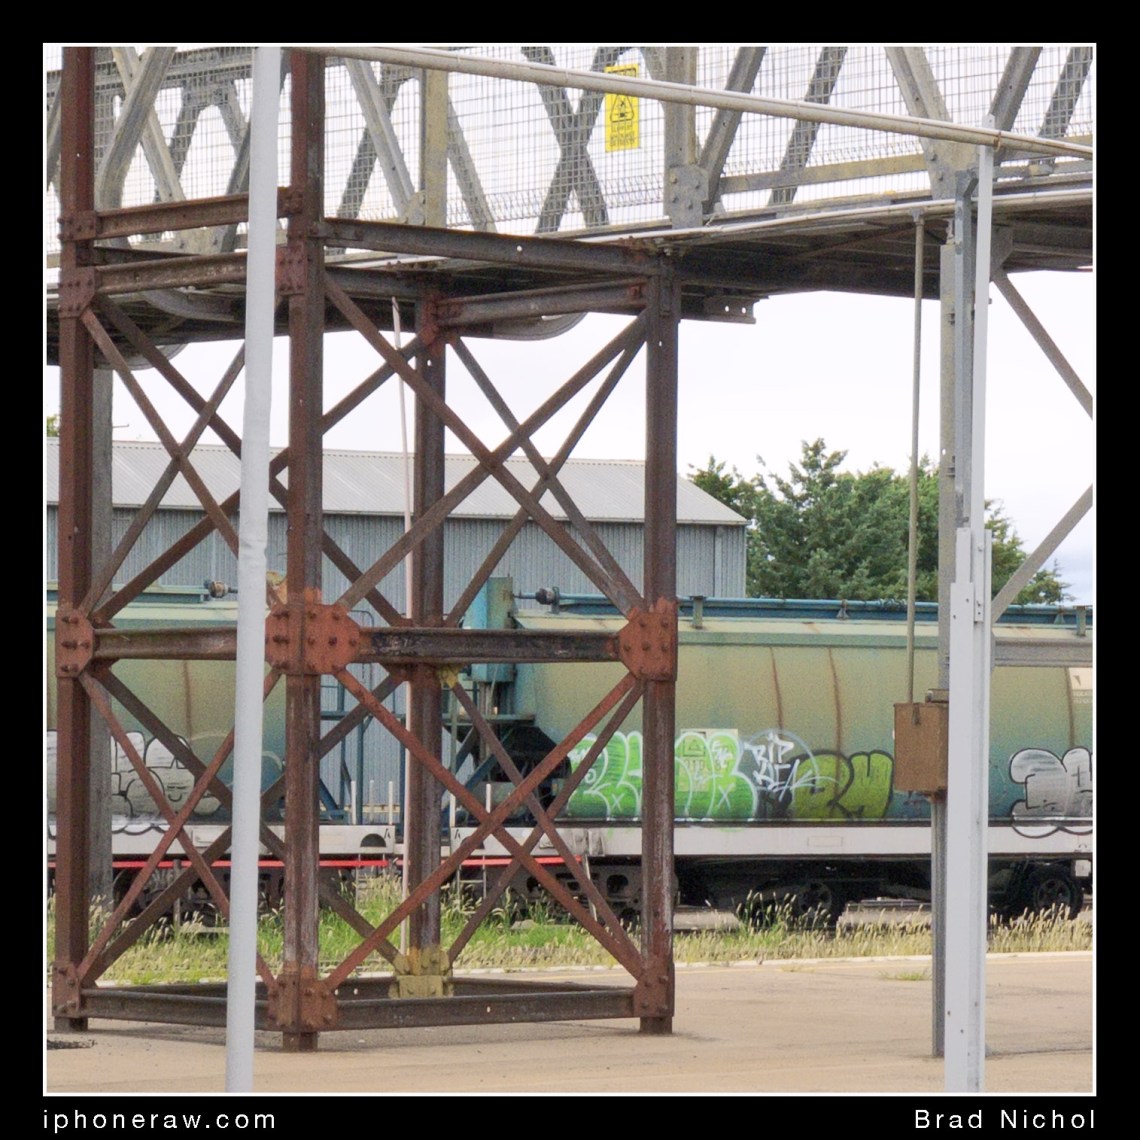
Honestly, I couldn’t find any; I tried all sorts of photos and subjects, I looked at the image at magnifications up to 500% with the input profile disabled, nada, nothing.  What can I tell you, well only that this is an impressive performance?

You may see a tiny bit of bluish fringing on white highlights if the exposure is set high enough, but this isn’t CA, instead, it’s the effect of very localised blooming, and even then I had to enlarge the image to 300% to notice anything.
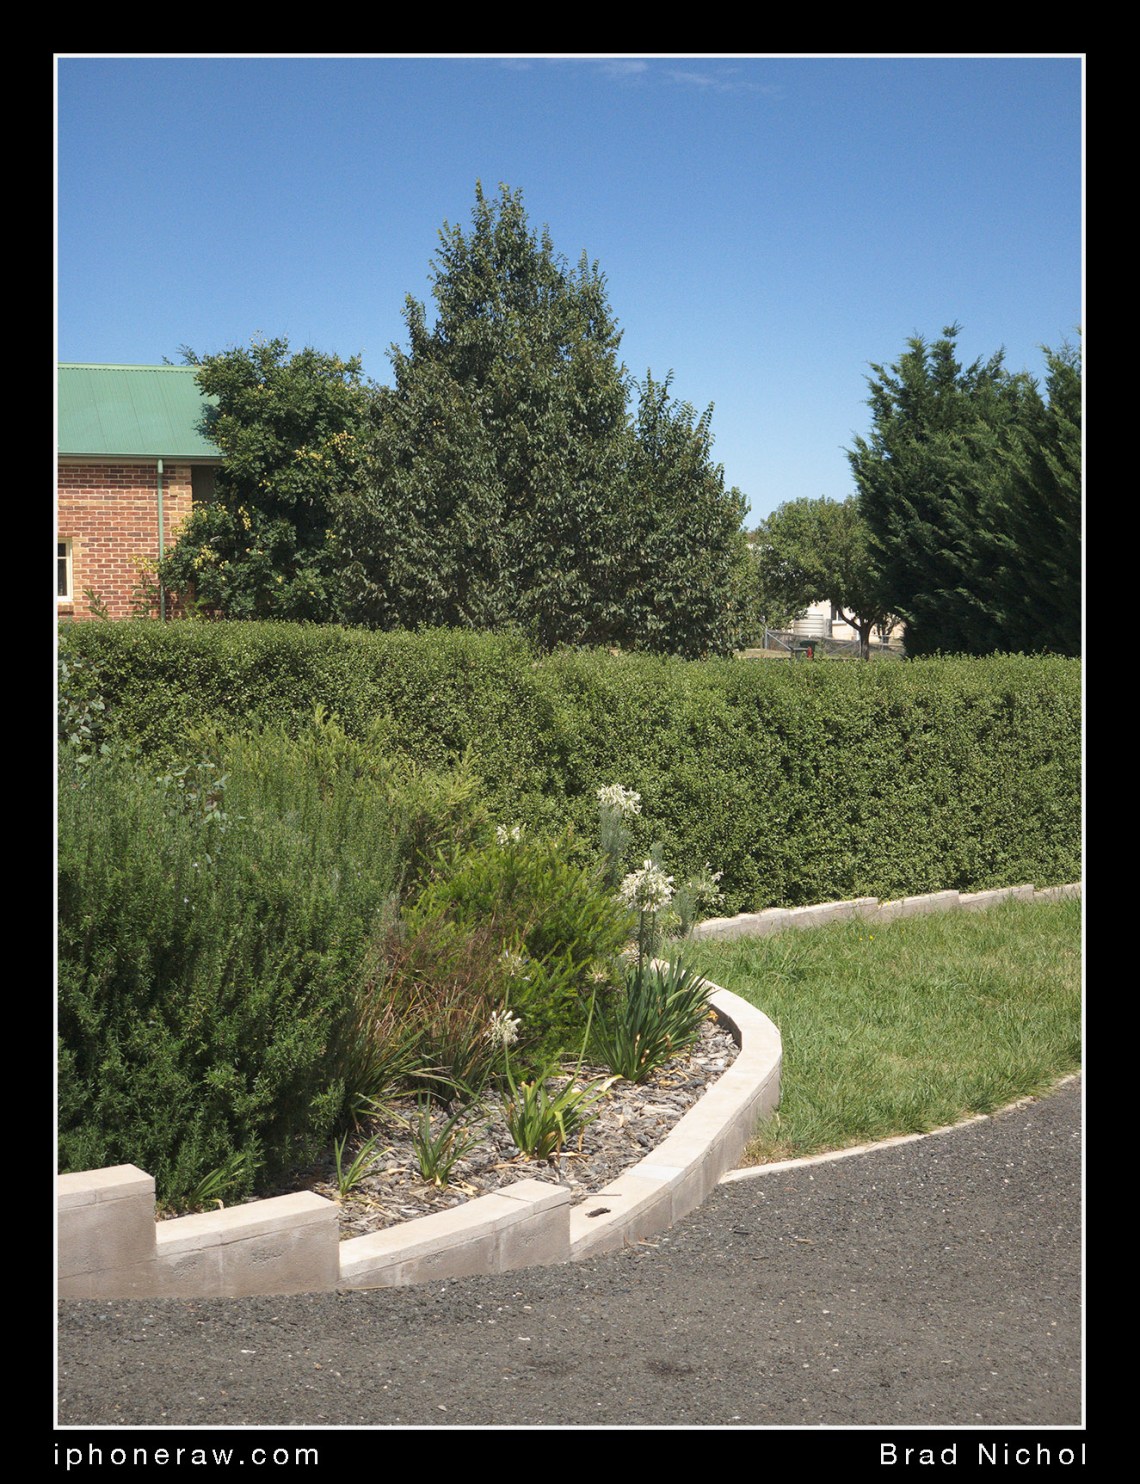
Chromatic Aberration test, Gouburn Rail Platform overpass bridge, iPhone X, Telephoto lens module.
This pic is a side crop from the above image; If you are going to see Chromatic Aberration, this is where it will show up. Basically, there isn’t any, the only thing you may notice that might confuse you is some moire‘ on the wire mesh, but even that is pretty minimal.

Distortion

This is a little tricky; the distortion level is minimal, low enough that I doubt anyone would ever notice it unless you were into the masonry arts and shooting brick walls to get your jollies.

On a couple of occasions I thought I could notice a tiny bit of pincushion distortion and then on another occasion I felt it was barrel distortion.  It may change a little as the focus distance changes, but really there’s no distortion worth thinking about.

The great news is that if you wanted to create stitched panoramas, the telephoto lens should make the job very easy. Oh and just in case you were wondering, yes you can use the 2X lens to take panoramas using the standard Apple camera app.


Coolamon Main Street NSW, iPhone X Telephoto lens test. TLC, film like colour and tone rendering.
I was running a quick and dirty test to see if I could find any distortion in regular pics using the iPhone X telephoto lens, none of the test shots showed up anything of bother. This test frame is a TLC image, one thing it does demonstrate is the extreme tonal range rendering of TLC files on the iPhone X. The shot is in direct and very intense afternoon summer sun with deep shadows in under the awnings and windows, other than a little bit of clipping on some near white painted areas the image holds detail throughout the entire tonal range. Usually, I’d need an HDR approach to get this result, which in this case is really quite like you’d expect from colour neg film.

Noise

To test the noise level, you need to be able to see how the RAW/DNG files look without any noise reduction applied.  Different applications handle the noise reduction in various ways and some like Iridient Developer, provide several options to deal with noise.

It might surprise you to learn that some noise reduction methods can actually make the iPhone images look noisier because they alias the noise, it also depends on whether you’re after a “clean down-scaled web image”, a screen image for the iPhone itself or something optimal for large or small prints.

Ultimately the only way to get a handle on things is to judge the inherent noise in the unprocessed raw file and then extrapolate how that might translate for different output needs.

In the case of the dual lens iPhones we need to do this for each lens because obviously, the sensors are an integral part and different in design (I suspect anyway).

Ideally, you’d want to use the iPhone at the lowest ISO setting to obtain the lowest noise levels, which is what I have done for this section, the next part deals with what happens when you ramp the ISO to higher levels.


Abandoned Fire Truck at Coolamon Track, iPhone x Telephoto lens test, TLC, texture.
Abandoned Fire Truck at Coolamon Track. I held back the exposure to ensure the highlights were fully recorded and used the TLC method for capture. The lens is excellent at capturing fine textural information which is just perfect for this type of image and makes it an ideal tool when you want to convert the images from colour to monochrome. Again there are no apparent issues for cross frame clarity, vignetting, CA or anything else. At first, I thought the picture showed some Barrel distortion, but I now feel it was an issue with the subject and the lining up of the shot.


Crop of Firetruck shot above. Great texture recording and clarity leaving plenty of room for contrast boosting and other editing tweaks. Basically, we have a nicely pushable file.
A section crop of Fire Truck above. The crop shows excellent texture recording and clarity leaving plenty of room for contrast boosting and other editing tweaks. Basically, we have a nicely pushable file.

For this test I use ProCamera, I also took shots using both UniWB and TLC methods for comparison and examined the images initially with all profile settings off, in other words with no sharpening or noise reduction applied, either early or later stage.

The lowest ISO option using ProCamera is just 16, though the app does not actually list this.  It’s not uncommon to be able to shoot within the range of ISO 16 through to 32 under bright sunlight.

TLC shots in Bright sunlight at ISO 16 will give a shutter speed in the range of 1/100 to 1/250 sec, which is hardly a challenge on the stabilised iPhone X.  To see any significant noise you’ll need to zoom into a 300% view or greater, most of the noise will be fine luminance noise, but the deepest shadows will show some chrominance noise that is slightly blue shifted.

Essentially the TLC files are noise free, and all noise reduction could be disabled, meaning you can then apply whatever sharpening you need to extract the detail level you want.

UniWb files typically end up with a better level of RAW exposure because the histogram is no longer acting like a filthy lying mongrel, you may get as much as two EV extra exposure this way.  The idea is to set the exposure so the brightest required details just about to clip.  Unlike the TLC versions, you’ll get some minor chrominance noise which will tend to cut in from the middle grey tones and increase as you go darker on the tonal scale.

My take is the optimally exposed UniWb files show very little noise to worry about at the lowest or moderate ISO settings; you could just dial in a minimal amount of noise reduction and then sharpen as needed, provided you don’t do something completely stupid the image will look great.

Just so you know, “completely stupid” might mean turning the saturation up to eleven, applying crazy amounts of medium radius sharpening, trying to recover deep shadows that we expect to be left well and truly in the dark.

Now, most people won’t shoot neither TLC or UniWB, they’ll just let the app do whatever it likes, so what exactly might they or you expect.

For regular exposure they will find 100 ISO is the point where noise becomes a bit annoying and needs cleaning up, 50/64 ISO will show fine filmic noise that for prints and downsized images could be left alone and might actually be helpful, anything over 400 ISO will undoubtedly be a bridge too far.

low contrast edited 16 ISO test frame iphone X telephoto module, garden scene, mainly blue and green.
Here is an edited version of the 16 ISO test frame, the DNG extraction, like most I do, was done with post editing in mind and therefore set low in contrast. It really demonstrates that the iPhone X Tele module can deliver the goods providing a pathway to full tonal rendering and a look that belies its smartphone origins.


Extreme crop 24 mp version iPhone X telephoto module/lens, garden scene, blue sky and tree with roof and bricks.
Now here is something extreme, this is a small section crop of the above image, but it is a 24-megapixel version of it. Yes, you get a little bit of luminance noise, but overall the resolution is pretty terrific when you consider that it is upsized to twice the native resolution!

Underexposure vrs ISO Gain

With many regular DSLR and Mirrorless cameras shooting in RAW, it’s possible to shoot using the lowest ISO and merely brighten the image in the RAW converter. You will often get a result little different than what you would have achieved by ramping the ISO in the camera.  The main benefit is that such images often retain a better level of highlight detail.

I thought it would be a neat experiment to try this with the Tele lens on the iPhone X and then see what could be drawn out using a desktop RAW file converter.

The fundamental noise levels were pretty much the same either way, but I did notice a couple of anomalies, in bright conditions the underexposed images seem to be sharper and more detailed than the higher ISO versions for the same shutter speeds.

I suspect the iPhone may be applying noise reduction to the DNG files as the ISO is ramped up, but I cannot prove this an Apple don’t of course document this anywhere.

The loss of clarity really turns nasty at around 320 ISO and beyond 400 looks horrible in almost every respect to my easily offended eyes.

On the other hand under low light conditions where slow shutter speeds are needed to grab those fleeting photons, the higher ISO DNG files seem to render better results than severely underexposed low ISO frames.  I took many images in the 1/30 sec and lower range and in most cases with custom processing, I could get slightly lower noise, more shadow detail and better clarity from the higher ISO captures when compared to the underexposed low ISO versions.  Just note, the shutter speeds for each of the test pairs were identical meaning the real exposure at the sensor level was the same in each case.

The extreme highlight detail was usually better with the low ISO frames once you applied the optimal processing settings, but not to the same degree it is in when taking shots in bright daylight conditions.

It became apparent in this process was that the optimal sharpening and noise control settings for each of the changes in ISO are considerable. It takes quite some effort to find the best settings….but in all cases, the final result was wildly better than equivalent JPEGs from the camera, which were all pretty mushy and “watercolour like”.

Under regular daylight (at higher shutter speeds) it seems the higher ISO ramps up the noise reduction enough to require considerably more sharpening in comparison to the lower ISO frames. While it’s entirely possible to obtain reasonable levels of resolution from the images shot at 200 ISO plus, the final results tend to look more forced and digital than the optimally processed but under-exposed low ISO frames.

For lower light levels I found I could get an excellent compromise by choosing an ISO of 160, in this case, highlight detail was still very recoverable, the shadows were fine and the noise looks comfortably filmic.

One final note on this, many folks would think the native colour noise (chrominance noise) from the higher ISO frames would be horrible. I found that not to be the case; sure there’s colour noise but its nowhere near as objectionable as it often looks in many of the processed DNGs and JPEGs I’ve seen on the web.  The real issue is the processing methods, many of which exaggerate the noise, turning the fine colour noise into ugly clumpy blobs of colour with underlying rainbow clouds.

16 ISO no noise reduction, unedited
16 ISO Garden Test image, no noise reduction, no post-RAW extraction edit. It shows a little more colour saturation natively than the higher ISO versions.


32 ISO iPhone X Telephoto Garden scen test
32 ISO, no noise reduction, in this case, the tonality is a little more natural out of the box, you can only see noise in the sky, but it’s fine unless you want to blow the image up.


50 ISO Garden Test shot, iPhone X, Telephoto lens.
50 ISO, with the noise reduction zeroed, we start to see a bit more noise in the sky, the file is still perfectly editable and shows plenty of fine textural detail.


100 ISO test frame Garden, iPhone X
At 100 ISO we start to trade off the fine detail if we want to turn the noise reduction on. Interestingly the shadows are more easily worked, but the highlights in the sky are tending towards clipping, though they are still OK and don’t show any colour distortion. Once you proceed beyond this point to 160 ISO, you need to compromise far more with shadow, and highlight rendering, small highlight colour shifts and you’ll need to add detail sapping noise reduction processes.

ISO Range performance

I find it hard to draw conclusions here as there are so many variables at play, the shutter speed used, the amount of light, whether you are targetting highlights or shadows and ultimately how you process the files.  In other words, it’s nowhere near as simple as with JPEGs where you can do a straight ISO ramp up and then point your finger at the results and give the definitive nod of approval.

But you want answers so I will make some generalisations that hopefully help you get optimal results.

  • Perfect focus matters more than with the standard lens, and under low light, the iPhone sometimes hunts a bit and settles on the wrong focus distance, if the focus is out a little you’ll probably try to ramp up the sharpening and that makes the noise look way worse.
  • The tele lens needs to be much steadier than the wide angle one; it’s far more likely you’ll get motion blur unless you pay a bit more attention.  I found that 1/30 sec was the point where problems start to crop up occasionally but everyone is different, your experience may be better or worse.
  • Anything over 400 ISO is going to look rubbish regardless of what you do in the processing.
  • 100 to 160 ISO is good for low light, even if you underexposure to keep the shutter speed practical.
  • Under bright light the lowest ISOs (16-32) can be radically under-exposed (like three stops or more) and still give terrific results, the main advantage is this will allow for extended highlight rendering without the hassles or deficits of HDR. A “2 stops underexposed” image shot at 16-32 ISO can do a very nice impression of colour neg film with sympathetic editing.
  • Under bright/moderate light there is a general drop in potential sharpness at ISO 125 and above, but it will be fine for many needs.


TLC Tractor
A tractor shot deep inside a shed at 100ISO using TLC at the Coolamon showground, minimal noise reduction was applied, this adds a bit of filmic grain but importantly kept the micro details perfectly recorded on the grille etc. Overall the pic looks a lot like it was shot on colour neg film and the file remains easily tweakable.


Postscript

Finally, I was fascinated by the excellent results delivered by the telephoto lens on the iPhone X and decided to do a little further exploration and see how it compared to a regular high-quality camera.

I chose to compare it to my Olympus EM5Mk 2 paired with the Olympus Pro Grade 12-40mm f2.8 lens.

In the end, the comparison grew more significant than I planned and I made test shots with the standard iPhone X lens and also tried cropped and panorama shots for the iPhone to compare with using a regular zoom on your Mirrorless camera.  All images on both devices were shot in RAW.

I guess, at this point, you are assuming the M4/3 reigned supreme, you might want to just hold off on that assumption, anyhow the article will be posted soon, then all will be revealed.


  • TLC files are captured using pre light filtering, this is entirely explained in my book “Ultimate iPhone DNG” available on the iBooks store.
  • UniWb capture increases the overall level of exposure to the maximum, again this is covered in “Ultimate iPhone DNG”


Gone to Ginza with an iPhone

Modern buildings in Ginza strip, showing glass, stainless steel, acrylics and concrete. Taken at night, traffic light and ginza sign.

When on holidays I take both my iPhone and my Olympus M4/3 camera kit, the Oly gets a workout on the more serious stuff, mainly when I need more reach or better low light capability, and the iPhone serves for most everything else.  I thought some of my readers might be interested in seeing a little photo story of the Ginza district in Tokyo captured on my iPhone while my wife and I wandered the shiny streets of Ginza.  I have another version of this article on my regular site with some extra pics taken on the Olympus EM5 MK 2, you can check that out here:

https://braddlesphotoblurb.blogspot.com.au/2017/11/ginza-district-of-Tokyo-photo-story.html

Ginza is 87 hectares of high end, over the top, consumerist worshipping retail nirvana for Japanese with money to burn and a need to proclaim their superior economic status. The greater Ginza area provides a fascinating insight into the culture of modern Japan and presents photographers with a veritable feast of options, both for the tummy and the lens.

My wife and I along with our Son Aaron and his partner Jain spent 6 days in Tokyo recently, staying in a hotel in Ginza.  https://www.gardenhotels.co.jp/eng/millennium-tokyo/ .  The lodgings were superb and ideally located for access to the Ginza district, subway system and great eateries where you can exercise your gastronomic muscles.

Like many high-end shopping precincts around the world, Ginza is dripping with the usual brands, except perhaps the presentation is little more excessive than usual. Considering that Ginza is home to some of the worlds most expensive retail real estate in “dollars per meter squared” terms, that excessiveness becomes all the more impressive, especially when you compare the retail space sizes to the residential spaces of Japanese units and homes.

Ah Ginza, it’s all “be-on-neon, sidewalk fashion parade and busy with a purpose”.  But, my friends, in case you think it would be like, say Times Square or some similar location in other parts of the western world be assured that Ginza has a flavour that is entirely different and in many ways uniquely Japanese, which is what makes it so fascinating.


Ginza strip at Dusk, city lights and neon
Ginza Strip at Dusk.


First the familiar, Ginza is devoted to the church of conspicuous consumption and the brands of choice are the same as almost everywhere else, Cartier, Hermes, Prada, Gucci and all the other usual suspects. Most of the shoppers are women, and indeed most of the stores are aimed at women, and of course, there are a lot of very nicely dressed people parading under the bright evening lights.

As always the store window displays are works of art but not dissimilar to the same store displays in other locations around the world, as you might expect in these days of corporate uniformity and branding.


Window displays of Ginza, Halloween period, aliens
Aliens on Harumi-Dori, part of a large contingent who have descended upon Toyo for Halloween.


The whole Ginza edifice is built on the concept of consumption rather than materialism, the joy is in the shopping, browsing, touching, and ultimately parading the high-end bags along the streets post-purchase.  Of course, most non-food purchases fall into the category of a “declaration of status” rather than fulfilling any real need for body covering, personal hygiene or life’s practical necessities.

I read an interesting article yesterday on the issue of consumerism and materialism, it’s well worth a look if you have the time and probably typifies the drive behind Ginza more than anywhere else in the world except perhaps Dubai.

https://www.theguardian.com/business/2017/oct/30/to-cure-affluenza-we-have-to-be-satisfied-with-the-stuff-we-already-own

But now for something completely different. Ginza is also home to some incredible Japanese department stores that sell brands and foods that are uniquely Japanese, examples being Mitsukoshi, Matsuya and Wako.  You may not wish to buy anything at all, but I promise a walk through the food halls alone will leave the average westerner agog at the quality and presentation of the foods and even more impressed at the range on offer.


Multi level high end fashion display in Ginza strip
Uni Qlo, Fashion store Ginza Style.


Beyond the department stores, you have speciality shops that are uniquely Japanese, such as the G.Itoya stationary store and Hakuhinkan toy store (or more accurately, emporium).

It is possible to explore Ginza at a subterranean level moving from shop to department store etc. via the subway paths, convenient in Typhoons and many folk choose this option to avoid traffic and crossings. Move out onto the streets, and you’ll notice several other aspects.  First, while there are a few high-end European cars, the vast majority of vehicles are taxis, and almost all of them are black old-school Toyota Crowns that seem ideally suited to their purpose and are immaculately clean.  In fact, all vehicles in Tokyo including commercial trucks seem to be fresh from the carwash, which may be a little thing perhaps but quite profound when compared to cars in most cities around the world.  The link below will give you some insight into the Tokyo taxis.

http://autoweek.com/article/car-life/unsung-taxi-heroes-tokyo-toyota-crown-sedan-and-crown-comfort.


Lexus 430 on Ginza, air bags, gold, parked, jacked up
Modified Lexus LS430 on the Ginza Strip, the LS series are very popular with Japanese Modders.


Nissan display for 2017 Tokyo Motor show, Nissan Corner Ginza
Nissan hyper sports concept car waiting to pounce from behind glass on Nissan Corner, Ginza.


Private passenger vehicles in Ginza tend to by high-end Toyotas and Lexus, there are few other brands on display, maybe the occasional high-end Nissan, and frankly, I think about half the worlds fleet of Lexus HL600s must reside in Ginza alone.

The most unique Japanese vehicle you’ll see in Ginza are the Toyota Century sedans, Japans most prestigious vehicle and almost always chauffeur driven.  The conservative but exquisitely built Century is the vehicle of choice for CEOs, Government Officials and the very wealthy, it’s the ultimate Japanese automotive statement.  Oddly a Century with the Chauffeur in situ seems able to be parked anywhere with complete immunity from harassment by Police or parking officers.  The Century looks bland in photos, but in reality, upon the Ginza pavement, a century seems imposing, regal and stylish in an old school way.


Toyota Century waiting on Ginza Strip, dark blue, series 2, V12
Deep blue Toyota Century in waiting on the Ginza Strip, the ultimate Japanese automotive status symbol, a luscious V12 provides the motivation in almost complete silence.


Your ears will notice, or should that be, not notice something else.  For such a busy place the traffic seems remarkably quiet, no loud exhausts and definitely no horns, in our entire time there I only recall hearing a car horn on a couple of occasions.  Generally, cars are driven in a calm, sedate and orderly fashion, the complete opposite to what you might experience in say, Rome.

The streets are a combination of broad avenues and narrow thoroughfares, and most are one way, but regardless of width, they are spotlessly clean, absent of buskers, beggars, pavement furniture, advertising boards and other physical impediments.

People move with purpose, but in an orderly fashion, there’s no pushing and shoving, talking loudly on phones, or aloud to one another, you could say those manners are pivotal to daily life in Ginza, but that’s true of Japan generally.

Regarding fashion, Ginza is conservative, the Japanese women do not flaunt sexuality but rather dress immaculately in beautiful materials, exquisitely cut and tastefully trimmed with discrete jewellery, refinement is a word that sums up the style.  Men tend towards the universal black suit, black shoes and white shirt, in other words, the typical business uniform one would expect to see in the financial districts of Manhatten.

Of course, Ginza is not all about shopping, there’s much eating to be done as well.  From the food halls in the basements of the department stores, through to the myriad of speciality restaurants, there’s an option for almost every palette, except perhaps for those looking for typical American style fast food.  KFC and McDonalds are present but much rarer than in other cities.


teashop in Mitsubishi department store, three staff, fancy packaging.
Typical of the displays you see in the food halls in the basement of most Japanese department stores, in this case, the tea counter. Japanese packaging is exquisite.


One constant however are coffee shops, there are Starbucks and equivalent style shops on every block, but I’d say for “Coffee Culture” loving Aussies like ourselves the coffee is generally a disappointment except for a few specialist coffee shops.

Ginza is close to many of the other Tokyo delights such as the Imperial Palace and Gardens, the Fish Market, Tokyo Tower and a wealth of other tourist delights.  The metro system is highly efficient and cheap, placing you within striking distance of almost anything you could wish to see within around 30 mins or maybe less.  For Aussies used to the vagaries of Sydney trains and buses, forget everything you have ever experienced, Tokyo despite its massive 24 million population just works, on time, every time!


Hibiyakoen, a park near Ginza, Tokyo, gardens, ponds, zen style.
Hibiya Park, a short walk from Ginza, sitting on the edge of the Government Agency District, almost universally Japanese parks are places of serenity and always spotlessly clean.


East Garden of the Imperial Palace, Tokyo, Japan, pond, autumn.
East Garden of the Imperial Palace, you need to walk a little further afield, but it’s well worth the time and effort.


Just to finish up on the technical side of things, the pics are mostly DNG captures, but there are some JPEGs shot on the standard app when it suited, and the multiple exposures were all JPEGs shot using Average Cam Pro.  As always the DNG files were extracted in Lightroom Mobile (now known as Lightroom CC), and I’ve done a little fine tuning on Snapseed.  The frames were created in Photoshop on the PC, and in some cases, a few small selective edits were made while there.


Composite image, Ginza strip, neon lights and cars, modern architecture.
Bright Lights Ginza Strip.


Multiple exposure, Tokyo plaza crossing, Tokyo Ginza district.
Crossing in front of Tokyu Plaza, Ginza, the intersection of Sotobori and Harumi-Dori.


Abstract art, window display, orange tones, Ginza Tokyo, Japan
Abstract art created from window display opposite Nissan Corner, Ginza.


Rain in Typhoon season, Ginza, Japan, from High rise.
Yes, it rains in Tokyo, our second Typhoon of our visit made for damp times, taken from level 9 of G.Itoya stationary store.


Lady standing in street under umbrella, Ginza, Japan, during Typhoon season, roads clear of cars.
No cars of many Ginza streets on a Sunday, Wendy, my wife takes shelter under the standards clear umbrella as the Typhoon rains soak the city.


Fish market near Ginza, Japan, seller, dried fish product.
The Fish Market area, a short walk from Ginza is home to a vast array of restaurants and specialist shops, wall to wall people on most days.


Modern buildings in Ginza strip, showing glass, stainless steel, acrylics and concrete. Taken at night, traffic light and ginza sign.
Stainless steel, glass, and acrylics are used to stunning effect throughout the Ginza area.


lady in rain in Ginza lane in drenching rain, running, neon door surrounds in background.
Drenching rain in a laneway, keeping dry in Typhoon season can be a challenge.


Tea on table in high end tea cafe, Ginza, includes timer, cup, pot and gold strainer.
It’s not often that you tea comes with a golden strainer and a timer, Ginza Miyuki-Kan Ginaza Gochome, one of the more specialized coffee and tea houses.


G.Itoya stationary store in Ginza, papers on display.
Japanese take paper very seriously, I have never seen such an array of paper types in my life, G.Itoya has a whole floor just devoted to papers, Photo papers also come in a bewildering variety of options not seen in most other parts of the world.


Don’t forget you can learn how to make your RAW, DNG iPhone files rock by purchasing my “Ultimate iPhone DNG” book from the iBooks store.  It’s the most comprehensive eBook around on the use of DNG on the iPhone and is the first in a series of 6 planned iPhone Photography publications from Zero One Imaging.

Buy it on the iBooks Store, click on this link:

https://itunes.apple.com/us/book/ultimate-iphone-dng/id1274334884?ls=1&mt=11


https://en.wikipedia.org/wiki/Ginza

Depth of Field and iPhone DNG

Yes, yes it’s true the iPhone doesn’t have the capacity for shallow depth of field rendering in the way your DSLR or Mirrorless camera does unless of course, you go very close to your subject.

However, there are some differences between what you can expect in terms of depth of field rendering from iPhone DNG and JPEG versions. Here’s a short video that discusses the differences, it may cause you to do a little re-evaluation of the accepted wisdom.

If you want to know more you can always buy my “Ultimate iPhone DNG” eBook on the iBooks store.

https://itunes.apple.com/us/book/ultimate-iphone-dng/id1274334884?ls=1&mt=11

Check out the video here:


The Ideal DNG Capture App?

A quick trawl through the catalog of Camera Replacement apps on the Apps store will soon reveal a plethora of apps laying claim to being the greatest thing since sliced bread. It can be a little confusing to sort out what you need and what really works.

My eBook “Ultimate iPhone DNG” has information regarding App choices but you might also like to check out this little video where I discuss the items/features that you would ideally be looking for…fact is some of the apps have deficits that rule them completely out of contention.

Buy Ultimate iPhone DNG on the iBooks store:

https://itunes.apple.com/us/book/ultimate-iphone-dng/id1274334884?ls=1&mt=11

Check out the video here:

Shooting Seriously With the iPhone in DNG?

Custom motor cycle seat construction


Here’s a quick question for you. Considering we’re spoilt for choice when it comes to amazing cameras and uber lenses that are able to render the hair follicles and yet unborn zits on supermodels at 50 paces why would you even think about using a mobile phone for anything other than a casual snap of that coffee and cake you had for morning tea.

Serious photos with an iPhone, are you serious, that just sounds totally contradictory!

Well if you disregard the differences with Depth of Field and the iPhones’ wide angle lens perspective you soon realize that when shooting iPhone DNG the dynamic range, sharpness and color are not too bad at all for many needs.

And here’s the thing, not all serious photos are taken by serious people with serious gear. These days lots of people who are not photographers are given orders from on high…”go and get me some pics of that event, make it snappy, and when ya done get it posted to our Instagram account…….. oh, and I want it on Facebook before you leave the office tonight or you’re fired”

Fact is, and I know this will hurt the ears, feelings, and egos of many of the sensitive photographic souls reading this.  I get lots, and I mean “lots” of people who turn up in my workshops on Lightroom, Photoshop, Photo Composition, iPhoneography etc who’ve been made “Chief Executive of Multi-Media, Instagram and Facebook, Resident Communications Dynamo, iPhone Wielding Guru” for their business or organization.


Storage area for upholstery materials.
Whatever the material needed for your seat, Mick probably has a roll of it somewhere.

Often these folks don’t actually edit the pics, others further down or up the stream might do that, but sometimes they’re expected to also be the resident “Photoshop genius”, with all the impossible expectations that infers.

These people are not actually photographers, heck they never intended to be photographers but that’s what they’re now expected to do, and damn it, those pics better be good!

So here we are 2017, the iPhone has DNG and all the extra goodness that it infers upon one’s image options and we have an increasing number of non-photographers and indeed even some professional photographers who now use the tool for serious work.

When I was planning my new Ultimate iPhoneography series of eBooks it soon became obvious that one of those books should look at what photographers and non-photographers with serious needs could do with their iPhones.  There’s definitely a strong demand for some wholesome but easily digestible information on how you might actually get the job done and importantly how to avoid the myriad of potential pitfalls.

Well that particular book’s still a way off, I’ve six planned for the whole series, the first book “Ultimate iPhone DNG” is already up on the iBooks store and the others are all well into the production phase but I thought it could be fun to show one of the sets of pics I’ve created in the preparation phase for upcoming “Ultimate Professional iPhoneography” book.

Lets just come back to the question of “why shoot serious (work) stuff with the iPhone”. I reckon there are several solid reasons.

The iPhone may be the only camera you or your workplace owns, maybe you or the workplace have decided that using a DSLR is just too complex.  (I wouldn’t necessarily agree with that but I well understand the way many feel about this situation).

An obvious one is the need for rapid turnaround and the benefits of instant sharing and no doubt for a great many such uses the quality deficits are less relevant.  You can easily crop the images severely and still have enough pixels for social media needs and honestly, regardless of how much traditional photographers protest, the fact remains only a very small proportion of images shot for promotional purposes find their way into print at anything larger than say 5 by 7 inches. Now even allowing for reproduction at 300 PPI, that 5 by 7-inch print only equates to around 3 mega pixels.

But I think you can make a case for iPhone shooting that transcends the traditional convenience and resolution sufficiency arguments, a case where sometimes the iPhone might technically be a great choice. (ASSUMING we are shooting in DNG)

Yep I know, right about now there are virtual knives and spears being thrust forth into computer monitors in the hope of impaling me or at least banishing my presence for the outer reaches of the inter-web, but please humor me, I’m just a country lad from a place that no-one much knows about.


Industrial sewing machine sewing embossed leather.
The industrial sewing machine had no issues at all in sewing heavy materials.

So what might those technical benefits of the iPhone be?

Well, Depth of Field is enormous, it’s pretty easy to get everything in focus and sometimes that’s just what you need. This fact might seem a little surprising to many who have come to the photography table since the advent of digital but once upon a time getting deep depth of field was a challenge and something professional photographers went to all sorts of lengths and contortions to achieve.

Related to the depth of field rendering, the iPhone can easily get really close up photos nicely sharp and yet still have quite nice separation between the subject and background elements.

Going further the lens is wide-angle, but it’s actually sharp right out to the corners, which is not a given with many regular wide angle lenses on DSLRs and Mirrorless cams.

Better yet, the lens/sensor size combination enables you to have some interesting perspective renderings that are impossible with larger sensor sizes without image stacking.

Now yes the iPhone is potentially a noisy little blighter but actually, the luminance noise, when shot in the DNG format at slightly elevated ISOs, is rather filmic and has a certain artistic appeal that actually works nicely for some types of images and especially monochrome.

Another aspect that few people will have considered is that it’s relatively easy to get total deep focus rendering from very near to distant objects by using focus shift techniques with only 2 or 3 frames.

So that’s not a bad list and for the working photographer and a tool only needs to excel in one specific aspect to make it viable for some selected shooting needs, no-one’s claiming the iPhone is the perfect portrait device, the ideal copy camera, the most powerful landscape tool, the last word or even the first word in the world of sport photography shooting, but then it doesn’t need to be either.

On the other hand, let’s face it, most DSLRs and Mirrorless cameras are still pretty hopeless when it comes to social media duties and many are very difficult to use for close-up work unless you have lots of other macro bits to go with them.

So onto the pics, our subject is Mick McCarthy from MJM Vehicle Trimming in my hometown of Goulburn NSW.  Mick is well-known for making the best custom motorcycle seats around for people who really want to be able to plant their butts on something more comfortable than the average plastic board with inverted nails that seems to pass for a motorcycle seat these days.  He still does some regular motor trimming for folks with special cars but basically motorbike seats are his gig, he also happens to be my neighbor and a friend.

I’ve gotta say it amazes me that all of the bike manufactures can produce machines which are brilliant in every way, yet they still can’t make a seat that soothes the average butt for more than 20 kilometers. Maybe we’re not actually meant to ride modern bikes, maybe we’re supposed to take them to the coffee shop, park them and then proceed to talk all kinds of BS about how great my bike is compared to your bike.  Anyhow Mick does great seats, the one he did for me totally changed the way I felt about my bike, that’s for sure.

Mick is a bit of “bike n car nut” and has a nice little collection of his own, and he really is a terrific bloke who loves to shoot the breeze on all those mechanical things that we fellas get excited about.

I wanted to create a set of images that gave a good account of the man and his craft, something that his family might treasure, but also something that told the story of MJM.


sewing leather material on industrial sewing machine.
Mick hard at work sewing a motorbike seat.

I think that shooting DNG files on the iPhone worked treat. I was able to get a tight close-up shot, super deep depth of field renderings (which I then dialed back to taste), a lovely filmic look and with appropriate editing some terrific shallow DOF stuff all with more than passable quality for most regular usages.  And I have to say I love the fact you can get into tight confines with the iPhone, it really is easy peasy with the iPhone on a selfie stick.

Lots of people get really hung up on the issue of noise but the honestly the noise when you shoot in iPhone DNG isn’t too bad and importantly it can be fine-tuned and even used creatively.  The key is not to shoot at high ISOs and before someone starts furiously typing a “full and well-expressed rebuttal on the folly of only having a low ISO option” think about it for a moment or two.  The iPhone lens is fixed at f2.2 or f1.8 and you don’t need to stop down to say f5.6 or 8 to get some clarity or depth of field, meaning you don’t need high ISOs all that often, provided of course you have the camera properly supported.  Some of the shots I took in his shed were at 1/5 sec or so but it all worked out fine.

And if the light is MIA and you need to bring in some artificial light via LEDs or tungsten then you don’t need near as much of it to lift the brightness levels to something workable when using f2.2 at say 100 ISO.  If you needed to use f5.6 – 8 @100 ISO with a DSLR you’d need about 8 to 16 times as much lighting power,  meaning either more lights or more expensive lights or a non-continuous light source, in other words, flash.

Yes, of course you could shoot your DSLR at a longer shutter speed, but then you’d risk subject movement or you could raise the ISO to 800 or 1600 ISO but then the difference between the quality of the two devices (when shooting in iPhone DNG) would not be near as wide as you might expect.  In any case, this article is aimed at those who are shooting with the iPhone and really don’t want to use a DSLR.

And just so you know, yep of course these shots have been lit, but in keeping with the concept of making it practical for those who need to use the iPhone for work stuff I kept it simple, just a couple of LED work lights on a pair of cheap stands with a couple of bits of foam core board.  All up the lighting stands and other bits represent about a $200.00 investment, which most businesses would pay for out of petty change.

Of course, if you want to compare JPEG outputs then all bets are off, those iPhone JPEGs are variable at best and the attainable quality level is nothing like that offered by the DNGs, so please don’t send me any arguments based on the JPEGs, I’d just be nodding my head in full agreement.

The big advantage of the DNGs over JPEGs is the pushability of the files, you can dodge and burn, sharpen and blur, crop and blow up in ways that the brittle JPEGs never allow.


cutting vinyl with scissors for motor trimming needs
Freehand cutting vinyl for a motorbike seat.

I find the idea of shooting with the iPhone then working out the Depth of Field rendering in post quite appealing, I’d normally choose to use a different camera if I want the shallow DOF look, but the approach can work pretty well.

Sure it takes a bit of work but then with practice, you get pretty quick at it, more importantly, it allows me to create DOF renderings that would be difficult or impossible if shot with regular DSLRs or Mirrorless cameras. In some ways, and I know this will prove a challenging statement, but sorting the DOF out in post is close in terms of flexibility to what you could do by using a view camera with tilts, shifts, rise and fall, except without all the chemical and scanning stuff arounds.  Yes, Yes I know it will not be as detailed etc, but we are not producing full-page spreads and billboards, basically most stuff goes straight to the web these days and honestly this approach looks fine for social media stuff and I reckon looks quite a bit better than the effects you get using the iPhone 7S plus portrait mode.

Going further on the Depth of Field simulation option, you can create looks that would not be possible with regular lenses, it’s easy for example to simulate the look of lens with significant field curvature or tilted focal planes such as with a tilt/shift lens, bokeh can be whatever you want and importantly you can create sharpness fall off characteristics that would be impossible with almost any regular camera. Ultimately if you start with an image that has overall sharpness, in other words, deep depth of field, you can blur it to anything your heart desires (given enough time/skill), on the other hand you can’t start with a shallow DOF image and then find clarity that was not recorded in the first place.

Sure this is a different way of working and it won’t suit everyone but like most techniques in photography, it’s just another option that might suit some specific needs. I imagine that those photographers who are fixed on the idea of photography being “what comes out of the camera” and with a strong belief that “editing is the devils work” will choke on the DOF simulation concept, but…. there are a great many of us who just accept and embrace editing as an integral part of the whole process.

I chose to go with a sepia monochrome look for this shoot but the colour versions are fine despite the basic light sources used, I’ve also added a little noise to give a more filmic feel.

iPhone DNGs can give quite different looks depending on how they are extracted and in this case, I used Iridient Developer with the noise reduction turned off. As you might expect that makes the files a little noisier but means they also look more film-like and more importantly they work really nicely with DOF simulation processes in Photoshop when you’re including added noise in the blurring process.

You might think, well sure the pics look OK on the WEB but surely the prints would be poor. Not so, 11 by 14s prints look rather nice and long ago worked out that if you make a good 11 by 14 you can pretty much print a file any size you want when you take into account the increased viewing distance.

I’ve put together a nice layout for Mick that he can frame and put up on his wall and despite the 36 by 34-inch size, the resolution is absolutely perfect.

Anyhow thanks for reading and I hope it has provided a little inspiration, Oh and if you want to know how to really shoot and deal with those iPhone DNGs check out my book “Ultimate iPhone DNG” on the iBooks store and you can also have a look at some other pics on my dedicated iPhoneography instagram site.

Just look for..   zerooneimaging or iphoneraw01 on instagram

Buy Ultimate iPhone DNG from the iBooks Store:

https://itunes.apple.com/us/book/ultimate-iphone-dng/id1274334884?ls=1&mt=11


Custom motor cycle seat construction
Measuring the seat for a Moto Guzzi Magni


Matching automotive seat materials.
Checking the match for new seat covers for a very collectible Ford Falcon 351 GT.


Motor trimming fasteners
Mick has pretty much any trim fastener you could need in his drawers, it sometimes takes a little searching though.


Keeping the dust of a motorcycle.
Michael’s’ low K MV often needs a little dusting time.


MV Augusta in Motor Trimming Shop
MV takes pride of place in the customer service area.


Restoring E type Jag seats; close up of staple gun in use.
Working on restoring the seats for an E type Jag.


Boss in Front of his motor trimming shop
Mick, proud owner of MJM in front of his kingdom.


Are DNG Files Noisier?

A common comment made by some photography reviewers and even quite a few iPhone shooters is that they think the DNG files are more noisy that the JPEGs, is it true?

Again, like lots of things digital……it depends.

Yep the files will look noiser before you apply the appropriate noise reduction but in truth you have enormous control over this and the jpegs only look as smooth as a babies rear end because the in-camera processing just obliterates all noise….and fine detail and color subtlety along with it.

With DNG we have choices and that has to be a good thing!  Anyhow check out the video to get a better insight and of course there is plenty more you can learn about noise control by reading “Ultimate iPhone DNG” which is now available on the iBooks store.

Buy Ultimate iPhone DNG for the iBooks store:

https://itunes.apple.com/us/book/ultimate-iphone-dng/id1274334884?ls=1&mt=11


Check out the video here


Why Are My iPhone DNGs so Poor

I’ve seen few items on the inter-web claiming there’s little difference between the JPEGs and the DNG photos, I’ve also been often asked about this in classes.  I reckon it’s high time to put the situation straight.

There’s an enormous difference between the two, it’s like comparing a takeaway hamburger n chips to a fine Italian sit down meal, not even in the same league.  If photographers are not seeing this difference it likely boils down to one of three issues.

  • Maybe they’re not editing the DNG files correctly or possibly not editing them at all, instead they are just looking at the initial “JPEG setting rendering”.
  • Could be that the images are only being viewed as small on-screen versions, in other words they are not being viewed on a large hi-res computer screen or as prints.
  • And…. the most likely the issue is poor DNG exposure.

It could of course be a combo of all three but regardless of the cause I have a little video where I discuss this issue, might be worth checking it out.  Of course all the intricate details and issues are covered in my “Ultimate iPhone DNG” e book which has just been released on the iBooks store.

Buy “Ultimate iPhone DNG” on the iBooks Store:

https://itunes.apple.com/us/book/ultimate-iphone-dng/id1274334884?ls=1&mt=11

Check out the video here.


Video – Why Shoot iPhone DNG

It’s a common question and there are several reasons.  In the end, DNG is not really an impediment to your mobile photography but rather a powerful option that will almost always improve the results you get from your iPhone……provided of course you have an understanding of the core concepts and don’t mind doing some post-shot editing.


Buy Ultimate iPhone DNG from the iBooks Store:

https://itunes.apple.com/us/book/ultimate-iphone-dng/id1274334884?ls=1&mt=11

Check out the video below for some inside info in DNG.


iPad Pro DNG, Monochrome Quality

Shooting Monochrome DNG on iPad Pro 10.5

A couple of days back I posted a preview test of the iPad Pros’ DNG potential, this is a short follow-up that looks at using iPad Pro DNG for monochrome.

Yesterday I took my iPad Pro down to my regular camera testing ground, Goulburn’s Historic Railway Precinct.  The precinct has all the elements you need to run real-world testing, high contrast situations, muted and bright colours, lots of fine detail, near and very distant elements.  Been using it for years, the really good thing is I can make meaningful evaluations between cameras from different times as I’m comparing apples to apples, as they say.

Typical of Goulburn in winter it was bitterly cold, I’m normally fine with that, but we’ve now moved into Goulburn’s well-known “Windy months”.  Basically the wind yesterday would blow a pitbull of a chain, it was supposed to have been around 50km per hr but the railway station has a national reputation of being “windy on steroids” and it didn’t disappoint.

I mention all this because it just hammered home my main criticisms of using the iPad outside for photos, basically it’s a sail, catching the wind perfectly and making it very hard to get sharp shots in less than calm conditions – In Goulburn that would stuff you up around 286 days of the year (according to official weather data)!

Remember the iPad Pro has no image stabilisation, but I did use the “delay stabilisation in ProCamera to take the test frames, I still got a few blurry stinkers!

Anyhow, I was wanted to determine a couple of things:

First using my *TLC-DNG methods how would the files handle the conversion to monochrome.  

And second, how did the resolution compare to shots I had taken at the railway on the iPhone 6S plus using the same methods.

You can check out the iPad Pro pics at the end of the blog, but here’s what I can tell you in addition to the comments I made in the previous post.

First, the ergonomics for handheld shooting are just bloody awful, especially in the wind, I seriously don’t know how folks do this with any sense of comfort.  I’m sure it would all be fine on a tripod but I don’t have an adapter at present to try that.

I checked some adapters out on eBay last night and frankly most looked decidedly dodgy – and those that didn’t cost stupid money to have shipped to OZ from the US!

Honestly, I just don’t think I could use the iPad Pro handheld, I spent the whole time panicking I was going to have a very expensive accident.

But now the good news…

The *TLC-DNG files are without a doubt much better than those from the iPhone 6S Plus, in every aspect, but a couple of aspects are particularly noteworthy.

The older camera modules show strong red colour shift in the edges and corners of the image which requires heavy-duty fixing in the Raw extraction phase (Most folk would not know this because Lightroom Mobile for example dials it out automatically).  This colour shift degrades the potential of the file because once corrected is exacerbates the noise on the edges and corners of the frame.

The iPad Pro and I assume the iPhone 7 series cameras have far less red-shift/vignetting natively thus the edited results are consistently much better but note the issue still exists at a lower level.

The second item and I really do love this, the edge clarity of the lens is better.  Again most photographers will never have noticed this shooting JPEGs or perhaps casually tweaked base DNGs, but trust me the corners are much more evenly sharp than with all the previous “i” device camera modules.

Finally, and this excites me, the files convert to monochrome in a very filmic way if you leave the noise reduction dialled out.  Basically, the noise looks rather like fine analogue grain  (think 64 – 125 ISO monochrome films) and it just works a treat.

I’ll finish off by adding that my initial shots in Kiama had me thinking the files were far more pushable than the previous iPhone models files.  Well yep, they are, they can be pushed prodded, poked and stroked much more vigorously.

So it’s all good, except for the ergos, but it all tells me I’m going to love my new iPhone 8 Plus come November….I can hardly wait.

Ok so now you can check out the pic

*TLC stands for True Light Capture and is an advanced capture method I developed many years ago, it is especially useful for iPhone DNG pics and is explained in full detail in “Ultimate iPhone DNG”.

You can buy the book from the iBooks store by clicking on this link below  

https://itunes.apple.com/us/book/ultimate-iphone-dng/id1274334884?ls=1&mt=11


Yellow locomotive flanked by grain freighters taken using DNG on iPhone Pro 10.5
How do iPad Pro DNG files edit?  I was interested in how the TLC-DNG files would edit once extracted, the answer is very well indeed, it’s quite easy to get nicely analogue results, no problems with tonal breakup/banding and colour can be nicely subtle. Importantly the files withstand all sorts of sharpening processes without cracking. It’s all good!
Hidden Loco
iPad Pro DNG Monochrome Quality? The monochrome conversions from the TLC-DNG files look really lovely, the tonality is terrific and detail really well resolved throughout the entire image. Noise (grain) is very analogue and should allow for some great inkjet print results. 
Mens on Goulburn Platform
iPad Pro DNG Resolution? You can’t see it at this size but in the full-size image, the bricks on that tiny building under the signals on the middle right can be seen. Which is to say…resolution and detail, in general, are not an issue.
 

iPad Pro 10.5 DNG, wide dynamic range, Goulburn Railway Station, Looking South

iPad Pro DNG Dynamic Range Ability. The impressive aspect of this test frame is the full tonality from shadow to highlight, this is not a HDR image. The deep shadows have been pushed in the conversion and held together well without breakup. Quite impressive really.
Shooting Monochrome DNG on iPad Pro 10.5
Testing the Dynamic Range of iPad Pro, this shot shows the possibilities, the fluorescent light was the brightest element, the shadows under the carriage are very deep. The result is excellent for a non-HDR capture, nothing is bleached and the dark tones sit where they should, it would be possible to pull more out of the shadows at the expense of a little more noise.
iPad-Pro-10.5in-DNG-Goulburn-Railway-Station-Bridge
iPad Pro Shadow Recovery with DNGs?  Sometimes test shots work out nice in themselves and I quite like this one, perhaps it’s the layered effect.  The pic shows how the deep shadows (under the bridge) hold up, nothing is clipped either.

DNG on the iPad Pro?

Can the iPad shoot DNG? One of my students asked me very a sensible question in an iPhoneography class a couple of weeks back, one I’d not really given much thought to before.

The short Answer is that only the iPad Pro models running the 12 mp iSight camera module are able to do this, so you have a choice between the 9.7 inch and the latest iPad Pro Models.  I have the 10.5-inch model so my comments apply to that only but I assume the larger 12.9-inch model exhibits the same attributes.

Yep, Ok Brad so the Pro model can do the DNG shuffle but is it any good?

The camera module is the same iSight unit fitted to the iPhone 7 and 7 Plus, which is to say it’s the latest and best incarnation of the module having the f1.8 lens and the most sophisticated sensor.  The main difference is the lack of optical image stabilization.

So the short answer was there’s no reason the iPad pro should not produce excellent DNG image quality provided you have an app that allows it to shoot in DNG, but I thought being a dedicated teacher I’d better delve a little deeper for you.

I decided this past weekend to give that a try, now please note I’ve not had the chance to do any comprehensive testing,  there could be some hidden issues I have yet to uncover.


Kiama Blow Hole, testing the DNG photo quality iPad Pro
Kiama Blowhole, taken with my iPad Pro 10.5 using DNG (UniWb).
Crop of Kiama Blowhole taken with iPad Pro using DNG (uniWb)
Crop from iPad Pro DNG looks great, fine detail on the water is excellent and the highlight tonality is vastly better than what you would expect to get from the standard JPEG capture.

You have a few shooting choices because you can load any of the latest iPhone DNG shooting apps, they’ll only fill the middle of the screen but you can expand them to a 2X view and they’ll then fill most of the screen real estate.

You could also choose to shoot using Lightroom Mobile, the iPad version shoots DNG natively.

As far as I know all of the dedicated iPad apps, Like ProCamera HD only shoot JPEG or sometimes TIFF. (Let me know if you have any alternative knowledge and I can update the blog.)

I have to say that in past I’ve had a good chuckle at people wandering around shooting with their iPads, it just looks so…. odd.  Frankly the 10.5 inch iPad Pro is a pretty cumbersome camera and no doubt the 12.9 inch is getting more than a tad ridiculous for the mobile photographer.

There are a couple of issues that show up in a practical sense, first, it’s difficult to control and hold the iPad at the same time, for example, setting focus points and exposure and holding it steady etc really seems to need about 3 hands! The iPad is large enough to catch the wind and unless you shoot in landscape mode it just feels uncomfortable, I imagine the 12.9 in version would feel even more precarious.  I’m sure you could get used to it but honestly, I just couldn’t relax when doing the “iPad out in the big wide world” test.

And then there’s the issue of actually carrying it around, sure it’s not heavy by any means but try as I might it wasn’t going to fit into any pockets I had.

But by far the biggest issue is that, well I just felt ridiculous, nobody else seemed fussed about it but I really couldn’t wait to get back to the car.

Testing DNG photo quality iPad pro 10.5in using TLC method
iPad Pro raw dynamic range is better than expected. In this case the image is a TLC – DNG and even in this downsized image it’s obvious that the photo possesses excellent textural information, the contrast range is very high as the inherently dark rock face is in deep shade, still it holds some solid detail and the breaking surf on the distant rocks still has full tonality.

So it was all bad then….no not at all, there’s lots of good stuff as well.

The screen is just amazing, even in the bright sunlight I could see pretty clearly what was going on and it was really obvious if the shot wasn’t in critical focus. For me however the really neat thing is the color and tonal rendering of the new iPad Pro screen, it’s far better than my iPhone 6S plus and shows no banding that I could see, looks like all that Apple bragging regarding the new screens was justified.

In the end, I couldn’t happily shoot outside with the iPad Pro, DNG or not, and I certainly wouldn’t entertain the idea of shooting with any of the JPEG only iPad versions in the great outdoors or probably anywhere else for that matter.

But it got me thinking, what if you needed to shoot indoors studio style stuff and you could mount the iPad to a tripod, ah well, then I think the iPad Pro might actually be a very useful tool.

As said, the screen is just brilliant and the size makes critical focus and exposure accuracy a cinch, you could work at a greater distance from the screen, and seeing such a large image definitely improves your ability to judge composition.  So yep this could be a killer indoor studio camera for people who need to shoot products etc but don’t want the complications of a regular camera set-up.

The real clincher, however, could be the easy interfacing with the amazing editing tools you can use on the iPad Pro.  Lightroom mobile just rocks on the iPad Pro but even better the new “Affinity Photo” for iPad Pro is utterly incredible, so in short, you have the possibility of a rather compelling workflow.

Ok enough of the basic iPad Pro stuff, what about the photo quality?

Well, the news is great, the DNG photo quality is excellent.

Kiama Blowhole park taken with iPad Pro using DNG, Test image.
iPad Pro DNG records excellent fine detail, this image is particularly telling. First, we have a square crop of the original 4:3 aspect ratio frame taken using TLC-DNG, you can take it from me the cropped off sections are just as detailed and clear.  The sky is nicely done and shows no banding, this image has not been corrected for vignetting so the corners are a little darker than the middle but that’s easily fixed if desired.
Kiama Blowhole Park 100% crop iPad pro DNG image quality test
Look at this 100% plus iPad DNG crop,  (note this is TLC -DNG so represents the ultimate possible image quality you could get from a single frame capture), have a look at that sign,  you can’t read it of course but it’s pretty obvious it has writing and icons on it, what’s even more impressive is that tonally the sign is very high up on the scale yet it holds full detail, it’s not even close to clipped….impressive indeed!

I must point out however that when I test, I always aim to see just how high the quality bar can be for a particular device, which means the DNG test frames are extracted in Iridient Developer using custom settings and in this case some of the frames were shot using TLC (buy my “Ultimate iPhone DNG” book if you want to know about TLC).

Long and short of it, my results should show the absolute potential of the camera with optimal technique.

Back to the test then, basically the 12 mp iSight module in the iPad Pro is a step up from the ones used in all of the iPhones prior to the 7 series models.

Specifically, tests indicate it produces DNG files that are sharper, have less noise, better color accuracy, less vignetting (when uncorrected) and virtually zero chromatic aberration.  In other words, it’s pretty much better in every measurable respect.

The custom processed DNG files show truly excellent levels of sharpness and impressively better highlight retention that the iPhone 6 series sensors offer, additionally I think the edge definition is improved but I would need to carry out more exhaustive tests to confirm this.

Kiama Blowhole Lighthouse iPad pro dng test procamera
iPad Pro DNG and near white tones? This TLC -DNG image has impressive near white tonality and I expect that a monochrome image captured this way with the iPad Pro would be excellent.

On the other side of the coin, I don’t feel I can see any significant improvement in shadow detail, but again I’d need to run some additional tests to confirm this.

Most people probably want to know about the noise, well I can say that when optimally exposed the native level of chrominance noise is much less obvious, in fact, I’d rate it a non-issue at the lowest ISO and the luminance noise is actually very fine-grained and film-like, so not at all unpleasant.

So to sum up, ultimately I feel confident after this quick test in saying the potential of the iPad Pro camera easily bests that of all the pre-iPhone 7 models and is by all fair measures rather excellent, provided you can keep the whole thing rock steady as there is no optical stabilization.

The JPEGs? Basically, I don’t really care but I expect they would be fine for non-critical purposes etc, if I get a rush of blood to head on a day of rare boredom I might run some tests on those, but please don’t hold your breath.

What I do promise, however, is that soon I will do an exhaustive ISO ramp up at my regular test site to see how this sensor compares to the previous gen iSight sensor, I expect it will do quite well.


Buy Ultimate iPhone DNG from the iBooks Store:

https://itunes.apple.com/us/book/ultimate-iphone-dng/id1274334884?ls=1&mt=11