It’s been twelve months since DNG was announced for the iPhone and around 11 months since it officially became available, still, the great majority of iPhone shooters haven’t tried DNG and indeed most casual shooters are probably not even aware that the DNG option exists.
As far as I’m concerned DNG for the iPhone is a game changer, in one swift movement it solves most of the core deficits of iPhone image quality, it may not be for everyone but there’s no doubt the difference in quality is truly significant. I’ve found in the past with DSLRs and Mirrorless cameras that the whilst the step up to DNG/RAW certainly made for better image quality I wouldn’t usually describe it as a quantum leap, that’s not the case for iPhone images, the difference is enormous.
So this begs two questions from photographers wondering about the ins and outs of shooting in DNG on the iPhone. What specific image aspects does DNG improve and how good can those DNG files be.
I’ll deal with the first briefly. Shooting in DNG and properly processing the files will provide the following changes.
Significantly better highlight and near white tonal rendering.
Far better textural information, your pics won’t look like they’ve been wrapped in cling wrap anymore, especially when the light drops off or the ISO gets ramped up.
Far fewer issues with posterization and banding.
Much improved shadow recoverability.
The ability to deal with noise reduction far more sensibly.
Improved skin tones.
Potentially better color.
Vastly better editing flexibility.
Cropping works better.…… and I could go on and on, but I won’t….
Trust me on this, the results are better in pretty much any way you might reasonably expect, but of course, you do need to know a little bit about editing and it sure helps if you pay more attention in the shooting phase as well.
So to the second question, how good can it really be, well I going to show you some samples but I’ll start by saying this.
Not one person I’ve shown comparative prints or full resolution on-screen images too has failed to be convinced by the results, almost everyone has said they find it difficult to reconcile that the images were even shot on an iPhone.
Before I proceed I must make a disclaimer and mention two things, one I have written a whole 400 page eBook on this subject, it’s the first in the series of six I’m producing on shooting seriously with your iPhone….so obviously I’d love you to buy a copy from the iBooks store if you’re interested.
Second, I have three core ways of shooting DNGs on the iPhone, I’m pretty confident that most folks are only aware of the regular method, so my results will probably be better technically than what the casual shooter will liberate, but the question we are asking here is “just how good can iPhone DNG be” not how good is it with quick and dirty techniques.
The first two samples are captured using the ultimate method, the last one via my middle-level method.
None of the core examples are from stacked images or stitches, just in case you are wondering, they’re all single frame captures.
It’s probably worth noting that the tool you use to extract the file has an enormous influence over the results and it’s possible to get all sorts of renderings by playing with various convertor apps and methods, both on the iPhone and your desktop computer.
But at the moment let’s just stick to the straight question, how good a single frame DNG captured and edited by optimal processes can be? The test DNGs have been created using TLC capture (nope I,m not explaining that, you can buy the book if you want to know more) and processed using Iridient Developer.
So first up your honour, I present this example, a JPEG test capture from a set I took to compare the various capture methods (including stacked captures which are not covered in this article), it’s a scene taken from a hill near my home in bright light mid-afternoon light. It’s just the ticket for testing resolution etc.
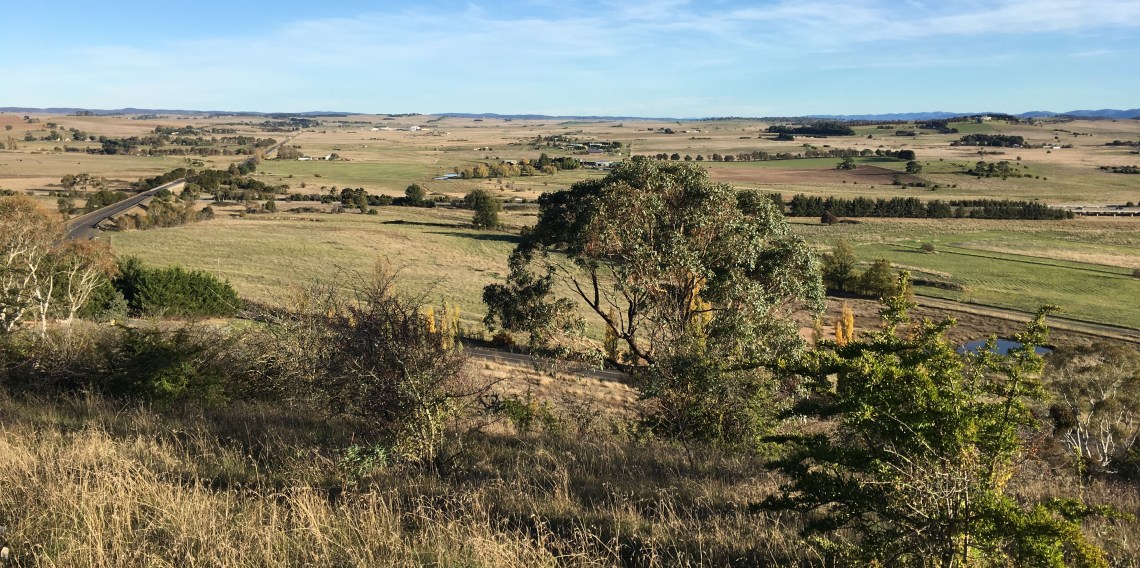
- Full-width JPEG frame, the sky has been cropped as it was incidental to the needs of the article, at this small size it looks pretty good.
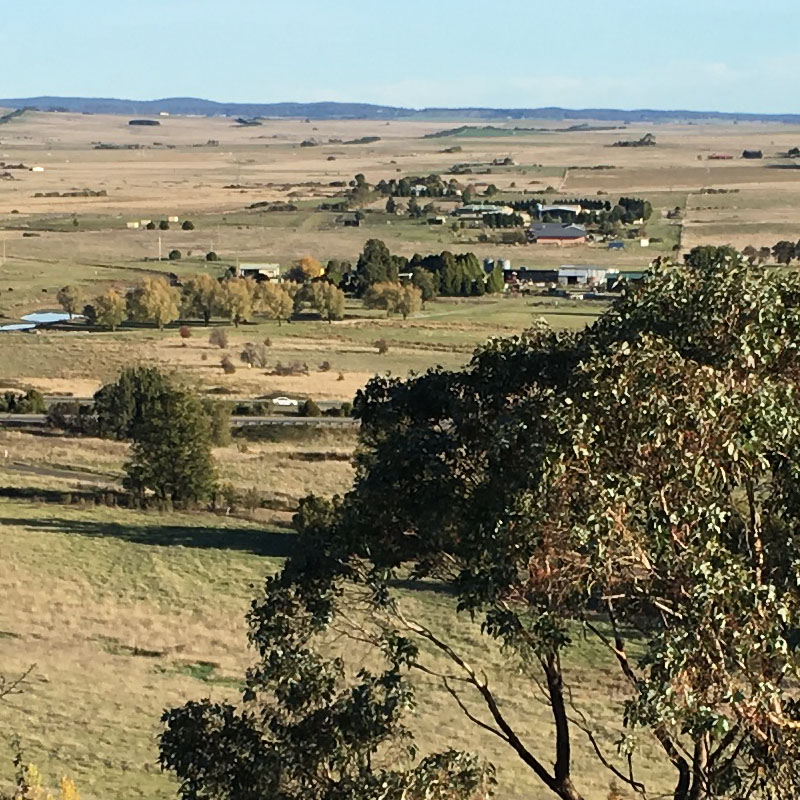
- Crop from the above JPEG capture, taken from the upper middle.
Just so you know all the images were all shot on a tripod and optimally exposed at the lowest ISO setting. In other words, the JPEG example is absolutely as good as it’s ever going to get with standard iPhone JPEG capture using the standard Apple camera app. You can be pretty sure that many of your iPhone pics will not be as good technically as this test JPEG due to small degrees of movement, less than optimal light and perhaps slightly compromised exposures.
Now let’s turn our attention to the optimal raw TLC-DNG capture.
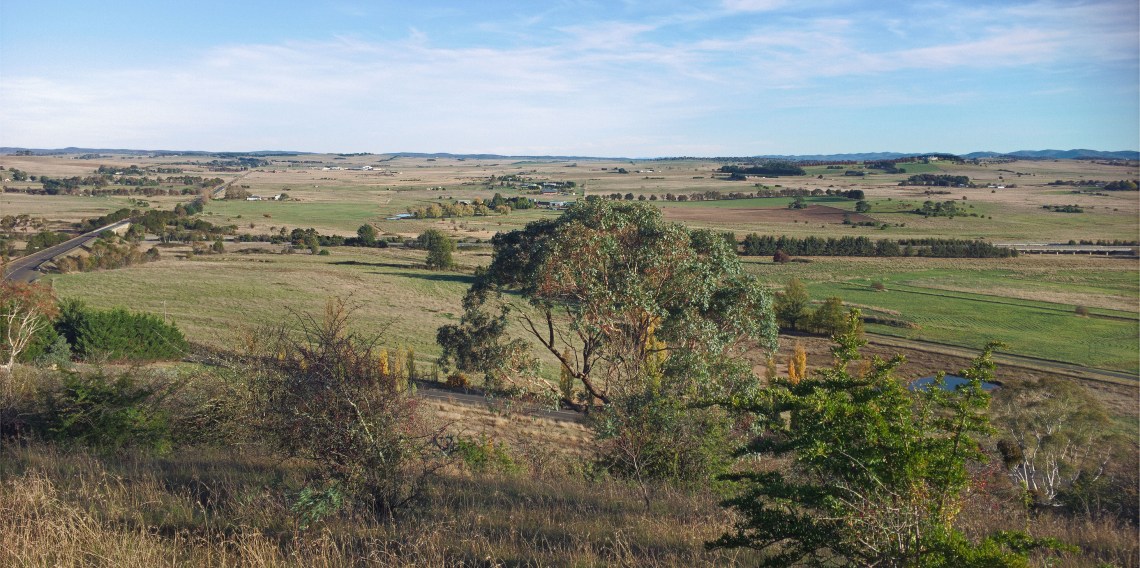
- Here we have a single frame DNG -TLC capture, this is the ultimate single frame capture option, a couple of things will be obvious, the colour is more muted and film-like, and even at this small size it appears to have more fine detail and more natural level of clarity, in other words it doesn’t look “forced” in the way JPEGs do.

- This crop shows where the rubber meets the road fine detail is just much better, color shows more subtlety, it looks far more analog, in fact it’s hard to believe they are taken with the same camera.
If all you want to do with your iPhone pics is share them to Facebook or post to Instagram then perhaps the difference between the test images may be irrelevant but let’s just examine those differences anyway.
First of all looking at the two overall images it obvious the color palette of the JPEG is far less subtle, but look closer and a couple of other color differences are evident. Take a peek at the bush to the left of center, it has tiny red berries on it, these are in real life a very bright red. In the JPEG capture you really struggle to see them at all, they sort of blend into the other colors. The same issue is evident on the Eucalyptus in the middle of the frame, it has new bright red shoots but again these are much less invisible in the JPEG capture.
Now turn your attention to the shadows, basically, in the JPEG capture they’re black, you can see it under trees, in the shadows of the leaves, basically, the tones just roll straight off into deep shadow. It’s possible something may be recoverable with some clever editing but clipped data is clipped data and honestly, there’s very little wiggle room in those shadows unless you’re happy to accept all sorts of nasty noise.
Looking at the highlights now, two things are evident, the JPEG tends to tint the sky a bit more cyan green, but also the white clouds are not actually white, they also have a slight cyan tint. Away from the sky, everything that’s yellow in hue is pushed a little bit more saturated and lighter in tone, this also holds true for skin tones taken on the standard JPEG app set-up.
Basically, with the JPEGs there is a limited difference between the yellows and greens and the overall level of saturation is natively a little more intense, you may not realize this but greater saturation and color subtlety are actually flip sides of the same coin, you either get one or the other. Once you jack up the saturation on a JPEG you can never get that lost subtlety back by dialing it down in post..it’s a one-way street.
The DNG overall is more analog looking, it could, of course, be ramped up in saturation if desired and the shadows could be deepened but as far as editing potential goes it beats the JPEG hands down then comes back around the corner to flog it with a big stick.
Now let’s take a closer look at those crops. Well, really this is a chalk and cheese difference, in fact, if you only saw the crops you might have some difficulty believing they are the exact same device! Basically, the JPEG has zero fine textural detail, distant trees and low to mid contrast details look “watercolour like”, the grass in the near paddock is simply areas of indistinct color. At this resolution, we can also see the shadows in the DNG really do have quite a bit of color information.
Something very subtle but I find important is that the aerial perspective is quite different, the JPEG has similar color intensity across the entire crop, whereas the DNG goes obviously from more intense color on the foreground tree to far more muted colour in the distance (which incidentally is about 8 km away), this, of course, is how the scene really looks to the eye.
In summary on the test pics. I realize some people may prefer the more intense and yellow rendering of the JPEG but in truth, the DNG can be made to look pretty similar if you really want that, the important thing is it can also be rendered very naturalistically and everything else in between.
I know that none of you stood next to me when I made these tests but I can absolutely state the DNG is far closer to the reality of the scene than the in-camera JPEG.
One question a keen shooter may have is “can the DNGs be enlarged to a higher degree for printing purposes”? Well print quality is nearly impossible to show on a web page, but yep I’ve tried all sorts of options and the sections from that DNG test image, for example, can be printed very large indeed yet still look very nicely resolved, in fact, it’s in large prints that the DNG difference really hits a home run.
Let’s round things up by having a peek at a couple of other examples.
The next pic is a shot I took on the Mornington Peninsula in Victoria, I was at the time taking some family snaps but turned around and liked what I saw. Now even in the small downsized image you see here it’s pretty obvious that technically the shot is very sharp, with good shadow and highlight detail and nice color without being over the top. But just take a closer look at the 800 px close up crop, I didn’t crop out of the plant in the front of the scene which is where the focus was optimally set, here we’re looking more into the background and yet this is really super detailed and sharp and remember this represents a print of about a metre wide!
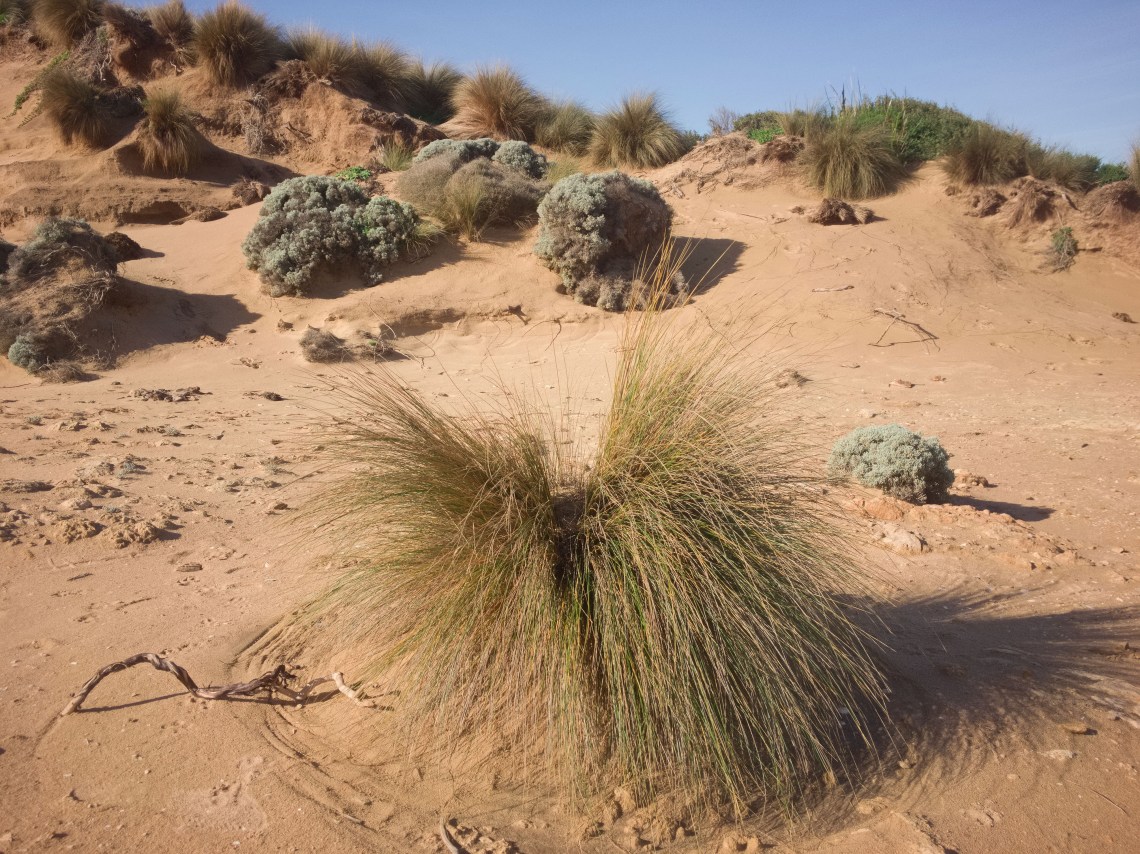
- Full Frame, the focus was set on the tussock grass, this taken in extremely contrasty light, just the sort of conditions that challenge the JPEGs when it comes to retaining both shadow and highlight details.

- Crop from the above, the file is processed in Iridient Developer on a Mac desktop, If you printed the whole image this big it would be approximately 100cm wide by my calculations! From any sensible viewing distance, it should look excellent.
Something not to be overlooked is that with optimally exposed TLC-DNGs the noise reduction can be switched right off and once you do that you get not only more detail to start with but also the files now respond brilliantly to all manner of sharpening methods. This is where JPEGs are severely crippled, post sharpening usually just accentuates the deficits of the JPEG compression and the over-zealous standard iPhone noise reduction.
The example below wasn’t captured using the ultimate TLC – DNG method but rather the middle-level option, and it’s really rather nice. The wagon wheel shows excellent detail and tonality and is nicely editable, in this case, I’ve applied some sweet low radius sharpening to bring out all that fine detail.

- A wagon wheel I found at the “Goulburn Historic Waterworks” taken with iPhone 6S Plus, using the UniWb-DNG method.
So in the wrap-up, there is no doubt that DNGs are potentially vastly superior in any measurable way. I’ll leave you by adding this, whilst these sample test pics represent the Ultimate single frame capture possibilities there are several multi-frame options that elevate the quality again, so just as a tease I’ve included a teensy tiny crop from 52 mp multi-frame TLC version……you’ll need to look back at the full frame pics to see just how tiny this section is. Yes, this one can print “seriously big”. I’ve done the maths for you it would be a print 1.5 meters wide! Obviously then you need to step back a bit from your screen or device to get a true perspective of how this would translate to the real world print, oh and those tree textures you can just see on the hill, that’s 8 to 9 km away from the camera.

- A tiny section from 52 Mp image stack taken using 4 frames TLC-DNG stack, printed this would be 1.5 meters wide! A greater number of donor frames could be used to further increase quality and reduce luminance noise.
Want to know more, here is the link to my “Ultimate iPhone DNG” eBook on the iBooks store:
https://itunes.apple.com/us/book/ultimate-iphone-dng/id1274334884?ls=1&mt=11